
A Man and a Dog is a game I’ve made in collaboration with my friend, Chris Lee. It is a game made in 3 days, for the Ludum Dare competition.
You can play the game here: https://yyz.itch.io/a-man-and-a-dog
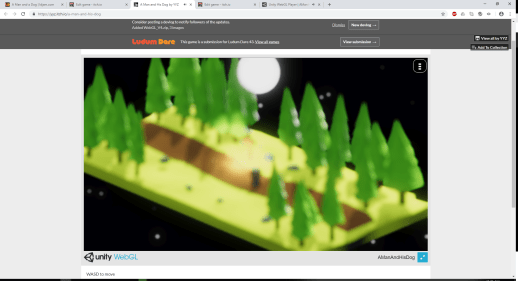
You can view screenshots of and feel free to rate the game on the competition page to show how much you liked or hated the game: https://ldjam.com/events/ludum-dare/43/a-man-and-a-dog

What is Ludum Dare?
For those that don’t know what Ludum Dare is, it is the world’s most famous game jam competition where participants have either 48 or 72 hours to make a game related to the announced theme. Anyone from any country can enter. On 1 December 2018, the theme for Ludum Dare 43 was announced – “Sacrifices have to be made”, and I spontaneously decided to take part, inviting Chris with me to join.
Here I will talk about how this game was developed in 3 days, how the core idea came to be, how it changed and will contain spoilers for the game so if you intend to enjoy the very short story or experience the little surprises in the game for yourself, you may want to play it first. Or if you don’t care, just read on.
This is also an exciting post because I will write about the entire game development pipeline all in one long post, from design to art to code to sound. Here we go!
Day 1 – Ideation

In light of the theme revolving around ‘sacrifices’, we initially had the idea of doing something related to the Trolley Problem, and make it into a game where the player has to make moral decisions, such as between sacrificing 1 loved one or 1000 strangers, and play out multiple scenarios like this one where you roleplay as possibly a different person each time.

However, in the end we decided that we needed to have an emotional context, or the player won’t feel anything for the sacrifices. So we needed a story! We needed a main character, so we decided about a Man. And maybe a dog! Basically, we want to tell a story about a man and a dog – I wonder what such a game should be called. The decisions the man has to make will get incrementally more devastating, starting with small decisions before ending with possibly having to sacrifice something he loves.
Given the time constraint, and this being our very first Ludum Dare entry, we had to be careful and humble with our scope.
Now that we had our idea grounded, we needed to settle how the game would look like or play out.
Style/References/Inspiration
For art style, Chris suggested that we look at ‘The Monster Inside‘, aiming for a black and white, low poly Film Noir appearance. Our priority isn’t to have fantastic looking graphics as we want to spend the time focusing on our idea.
For story inspiration, we had a look at a short film: To Build a Fire
Day 1.5 – Prototyping
We spent about 1-2 hours just talking about the story and gameplay on Skype and Chris awesomely wrote down our discussion into a neat flow chart to structure our story and to label each scene for development.
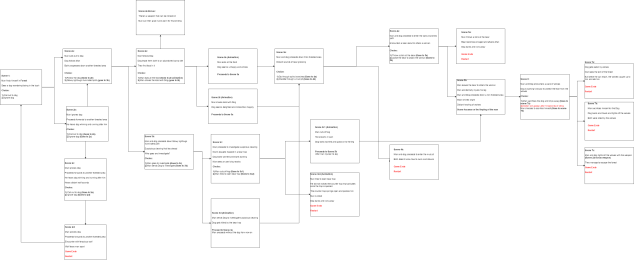
I then dived into writing the code and a system to establish the flow of the game and within a night I had a prototype running up with a complete system to add, remove and insert scenes wherever they are needed. This was done by creating a StoryManager singleton which can be thought of as a master script that controls the scenes and how they flow between each other.

Why make a system when I could have easily done it faster with something simple like if-else statements?
Well, for me that is my preference and my takeaway from past projects. Thinking of and writing the code for a proper system can cost more time initially, but I felt it was important to have the flexibility of removing, rearranging or chucking in new scenes easily since this was our core concept and I didn’t want to waste time rewriting code later on if we underwent major story revamps.
I got started with some previsualization (previz) by modelling some simple objects for a typical forest scene. This was basically to visualize how the game looks and feels with some very basic assets (the 3D models of trees were just modelled with the bare minimum details to look like trees), so as to visualize a forest, which is our primary location.

This is the first look of our game on our first night I made up with some simple animated trees and some particle effects at the bottom (they are used for the campfire and fireflies). I quickly put those together to inspire Chris before he began working on the official art:
Along with some mock gameplay to test out our idea:
The player is able to select their choices by clicking the buttons below and they would each lead to a different scene, transitioned with black screen fade outs. Music was later added and is persistent through scenes.
I then showed this to Chris. Some things we noted: The characters were static and would only play out fixed animations based on the options we chose. The only thing the player can do is to pick one of two options. We felt this made the game feel too short and wasn’t very immersive. We wanted some level of interaction, where the player is able to interact with the environment and make choices on what to interact with.
We had only spent a few hours. Our first day was very short (less than half a day) as the jam was actually announced at a very bad timing called right-before-my-bedtime. So I went to sleep just as the jam started and we only had a few hours to work for day 1 before Chris knocked off for his turn to sleep.
Day 2 – New perspective and movement
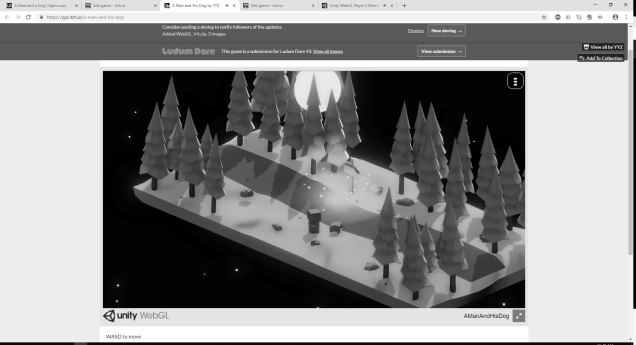
The next day, we decided to then try out having controllable character movement similar to MOBA games like Dota. But we opted for WASD movement instead of clicking to move. The size of the world was also increased. It gave us this.
But now the world was too big and trees would occlude the camera view. However, we liked the dialogue popups that would appear as we get closer to certain objects and disappear as we moved away. Being able to control the character also improved immersion. So we shrunk the world back down to keep the play area small and kept the things that we liked.
Day 2.5 – Integrating final graphics


Then came the time to create the art. Chris handled much of this area, whipping up all the necessary 3D assets to create awesome environments, props, and characters. We went for very minimalistic shapes for the characters – cubes. But I felt the cube characters were a little bit too simple and I was worried the player may not be able to identify the secondary characters too clearly, so I added more facial features, such as jaws to the wolf to clearly identify it as a menacing creature, and two legs to the woman character, to show that she is a humanoid and not a four-legged animal.
The tree swaying and dog idle animations were made with by Chris with something called blend shapes – to make the tree move from one position to another smoothly, two “snapshots” of the tree’s shapes at the extreme positions are made, and then the software blends them together to form the missing pieces (the in-between frames) to give the illusion of motion, and hence, blend shapes!
For workflow, he passes me the characters and props assets individually as FBX files. FBX files are 3D model files (like PNGs but in 3D). So the tree FBX contains the geometry of the tree, the animation data (blend shapes) and also the textures. In this case, it may not look like we have textures, but we still have a ‘grey material’ on the tree.
We used only a single tree.fbx.
And then we have 16 environment models exported as FBX into the Unity game engine. The environment FBXes look roughly like this:


But the trees in the environment here weren’t exported with animation (by intention), just the geometry. So to get all the trees to animate they would have to be individually re-positioned in the engine (Unity) again even if they are done from the 3D modelling software! But isn’t that a waste of effort and time to do double work?
Well, I didn’t want to manually go through scene by scene and replace each tree 1 by 1 with the animated version of it, so I wrote a script to do that for me!
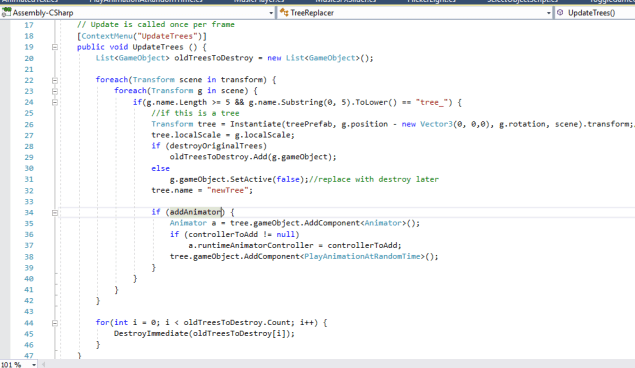
I’m not sure if this is actually a pipeline-related issue of exporting files from one software and importing into another, but from time to time on projects I face “time-costing” issues that are stuff which are super simple to do but just tedious. Sometimes I just use scripts to handle repetitive chores because that’s what programming is for – save time on repetitive tasks, even when it comes to art. So here I just wrote my own tool to save time when handling the importing of assets from different software. This script will add the necessary components needed for the animation and take care of scale, positioning, rotation of trees across all current, and future imported scenes. I ran the code in a safe test environment to confirm that it works (in case the script ends up destroying stuff), before finally letting the code run within the editor on the actual models. Within a few minutes I had replaced all the static trees with animated ones. It would be a LOT less fun to do this by hand with manual labour, and take up way too much time in a game jam.
The last thing to do was to play the animations at random timings so all the trees sway at different speeds. Yes, we only had just ONE tree model, ONE tree animation for the game. They were all just of different scale values, and playing at different animation intervals to make it look like we had a variety of trees. Talk about efficiency and cutting costs time!
- Cool-looking swaying trees by Chris
Along with occasional particle effects, our forest was looking very alive. This is important even for a game where the environment isn’t the main feature because it makes your game more immersive, and you make the player actually feel eager to want to explore. Now that we had our cool-looking swaying trees, it was time to move on.
I continued working on getting the dialogues ready.
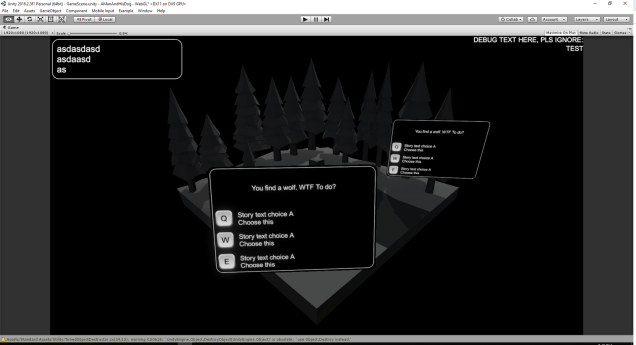
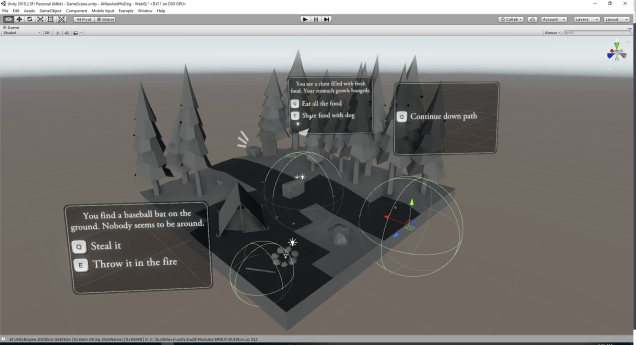
This was a lot harder than it seems as every scene can have multiple dialogues as opposed to the previous system fixed at one dialogue per scene. The dialogues were also now at the world-space level rather than as a user interface, which means that they are placed within the game world itself rather than as a UI element overlay. We completely removed the need to interact with the mouse and choices can be made with the “Q” and “E” keys. Also in the image above, the dialogues were varying in sizes, so I changed them to be more consistent in size and positions, and used this shader which would make the UI render on top of all 3D objects, regardless of their z-pos. (By default, objects closer to the camera are drawn on top of objects behind. However, that shader allows me to have a dialogue panel all the way at the back of the environment, and yet still be drawn on top of it, without getting blocked by trees that are actually physically positioned “in front” of it in the world.)
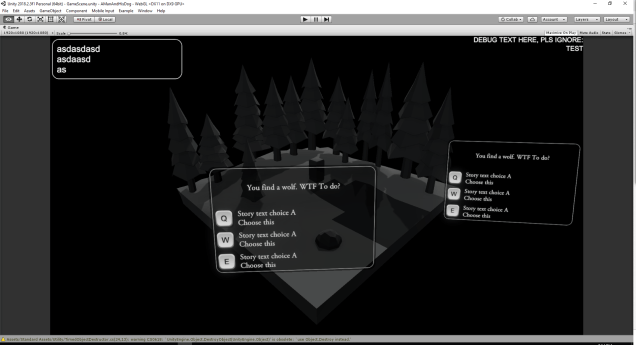
Chris also suggested that I lower the opacity of the dialogue background panels. This way, they weren’t as obstructive and I could make them bigger, and have larger font sizes for better readability.
Now we were getting somewhere.
Scripting wise, I wrote the text in Visual Studio, the IDE I use for programming.
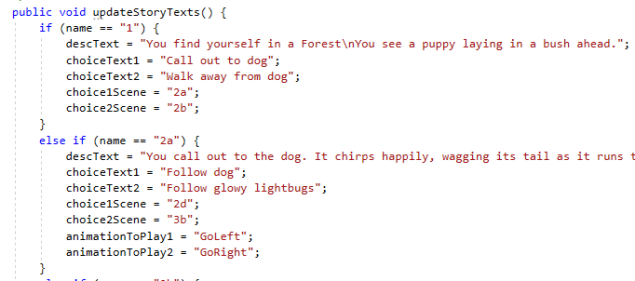
Dialogue was previously determined in code. It was my preferred way. The script would determine what each scene says – the scene name, description, the dialogue choices and all the text data was nicely packed in one script and easily navigatable instead of scattering the text throughout different scenes.
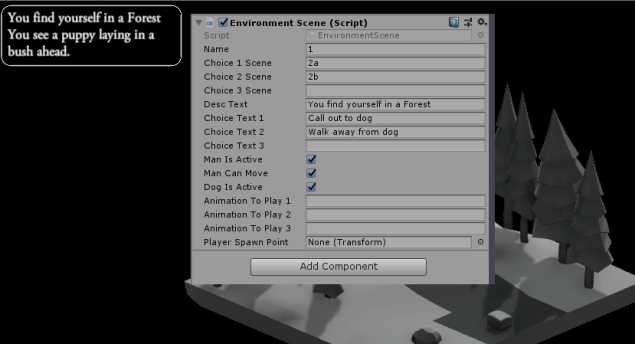
However, with the change to support different dialogue panels per scene, doing it by script could actually be less organized. So I implemented the dialogue in a more object-oriented fashion, which was more visual. So I got rid of the old scripting way of setting text.
Above, I am able to dive into any dialogue panel and edit the text immediately and move them around in the editor to anywhere I want.
The ‘range’ in which the player must be in for the dialogues to appear are indicated by the green spheres at the bottom, again very visual for me to edit and each dialogue panel’s radius can be customized too.

Day 3 – Animation and Scripting
Now came to the final day. This was the most intensive day of all. Chris had by now completed the 3D assets and prepared some sounds for the game. I worked to implement the story and scene animation.
Events were being triggered mostly through colliders. I placed a trigger collider on the player which makes it easy for me to trigger events based on player’s position to the target ‘interactable’ object. I would use these events to trigger various things like animations, dialogue popups to appear, and even sounds. This makes it super easy for me to call animations dynamically.
But that was the hard part too – dynamic animations meant some things had to be scripted rather than having purely keyframed animations.
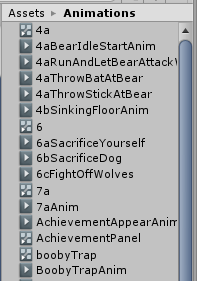
This was a huge chore, and the animations for each scene would take me between 1 to 2 hours each! It’s not just animation, but scripting as well as the animations are pertaining to dialogue choices. The game is actually more animation-heavy than I thought, as we have many scenarios and each scenario has multiple choices and outcomes!
For one of the scenes, Scene 6, I had “6a”, “6b” and “6c” animations to make, just for one scene! Even if they are just four seconds of animation each, they each take time.
There was not a lot of time left so I worked through the night to animate everything. All the animations were done on the game engine side, using Unity’s Animator tool.

The animator allows me to trigger events and functions, so you can have a trigger activating an animation that triggers an event that triggers some sound to play and triggers another animation. If you’re not careful you end up with ‘triggerception’.
If you’re actually reading my code, which you should not be, note that my code for the jam isn’t actually the cleanest. It is a game jam afterall, and speed is prioritized over cleanliness for some scenarios, though I always make an effort to stay organized.
Intertwining animation events and code frequently does get really complex in a narrative or story driven game like this one which relies a lot on these. I had never made such a game before so this was definitely a good learning experience.

Precious time was ticking by as I only had a few hours left.
I also changed the camera from Perspective to Orthographic, which was an idea by Chris, to make you feel like you are in control of the person from some higher being, and to get the 2.5D isometric look.

The perspective mode has a more 3D look and has more depth, but we didn’t need a huge looking world, just a small one where you can view the world at a distance. It also eliminates the worry of needing to have details up close, which matches our low poly style.
However, I really liked the perspective view, so I kept that for the Main Menu’s camera. Speaking about the main menu, it was time to do up a proper menu. A Main Menu is important because it is the first impression players get about the game. So making sure it’s not too haphazard was one of my priorities. I added a slick camera transition to move to and from the achievements, which was later improved to this:
This was easily done by grouping the achievements’ UI and separating it to render under a different (world) canvas from the screen canvas, a trick which I’ve always used to render world-space text and UI. By using multiple canvases, I could fade out specific UI without affecting others, and also control each canvas’ graphic raycaster, thanks to Unity’s <CanvasGroup> component.
This also allows me to ignore clicking on the screenspace canvas when it is faded out, resolving a bug where invisible objects were still receiving user input from mouse clicks and causing buttons to trigger clicks unintentionally.
With that, it was time to export the game to WebGL, so that it can be played within the browser! I was careful to make sure this was set up right because porting it to web can cause many issues depending in the project if not done well. I had lost hours just digging through web issues in the past where bugs or problems would occur on the web versions of the game despite looking fine when I played it locally on the computer.
This time, I faced no issues getting it to work on the web. I had made an interactive web piece recently, so the workflow and knowledge I had to export the game to WebGL was still fresh in my mind and this was done very quickly.
I also added an achievements screen into the main menu.

Sound
At this point Chris has also just woken up and was able to help with addition of some sounds to help improve the game.
Even in a short game jam, sounds are very important to give audio feedback to the player, in addition to the visual feedback. Playing a sad whimpering dog sound versus a happy, excited dog bark makes the difference to help the readability of the consequences of the player’s decision in the game. Chris did a good job finding the sound.
One of the fun sounds I wanted to add was a jarring jump scare sound that I really wanted to have for this ‘shocking’ scene, where the player gets abruptly smashed by a FREAKING GIGANTIC CUBE with SHARP SPIKES AT THE BOTTOM.
NOTE: EXPECT SPOILERS FOR THE GAME BELOW!
20 minutes left – But one last thing to do
With 20 minutes left to the final submission, I quickly cooked up a final feature, to make the final scene a lot more impactful.
For the entire game there was one thing evidently missing in the world by intention – colour. I wanted the final scene to have a visual impact and really sell the ending. As it is a simple game, there isn’t much more we could do to enhance gameplay or story. But to make the ending be more powerful, I added color.
Yes it is partly because I was sick of seeing the grey, colourless world, but hopefully it also breaks the expectations of the audience to do something cool.
This was a quick way for me to make the ending of the game cool and memorable. It was done with swapping out the default post processing effect’s profile I had put on the camera with one that supported (de)saturation and changing the saturation level by script. Basically it’s realtime scriptable color grading, pretty cool.
By the way, the game assets are actually black and white, and the final scene is the only one where I gave them coloured materials.
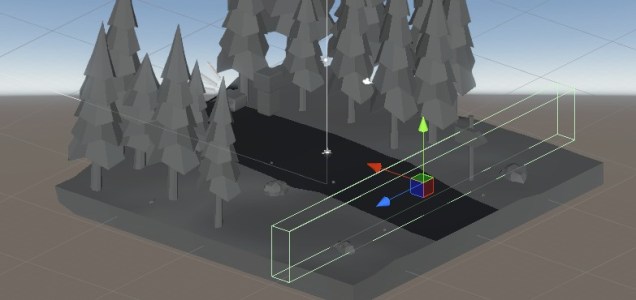
To make this scene even more prominent that it’s the final scene, I extended the size of the map with a flipped duplicate of the square terrain (which I bet you did not notice). Not only does this give you more ‘distance’ to walk for the colour to fade in more gradually, but I feel it also kinda marks it in your subconscious brain that this is different from the previous levels and is the final level, setting the right expectations that the game has ended, leaving you satisfied instead of feeling abrupt.
And with that I submitted the game for the competition!
Polishing the little things
I added an achievement panel popups for when the player earns an achievement for the first time, so they know they unlocked something.

Then I added a proper settings panel with the ability to restart or quit, and adjust music and sound volumes separately.
The achievement icons got upgraded graphics and have some animated FX on the icons for when they are earned.


I also used depth of field to create a background blur effect when the player dies.

I also added ambient occlusion (SSAO) to ground the scene more and to get more dark shadows underneath the pine trees so the cone layers of the trees look more defined and closer to Chris’ reference layout images.

Honestly it looks so much better. In case you were wondering why it isn’t baked, the effect is screen-spaced as there simply wasn’t enough time to use baked lighting to obtain true global illumination (GI) and AO for the 16 scenes that we have, so performance wise and visuals wise this could’ve been improved through baking the AO outside of the jam. This method is also so much quicker to do as it is just a few clicks.
It was also after the submission when I made the change to the final coloring visual effect to the final scene here, to transition based on player’s distance to the exit, so as he gets closer to the exit, color will slowly fade in. This was really cool, as opposed to the previous method where it just gradually faded in. I didn’t have time to write the proper code during the jam so it was only done when I had time for polishing.
Unrelated to the game, here are some cinematic shots of the environment taken with a completely different perspective from the game. It has a totally different feel with colours and even looks like an entirely different game. I picked out some of my favourite compositions, which is basically all of them.
Upcoming Improvements?
1 day after the game’s release, we got our first rating and comment from a nice person on the internet, Lizouille.

Some improvements to make to the game as comments from my friend was that the first two endings didn’t felt like endings, which was not helped by how the “you died” panel wasn’t significantly different. So I will work on changing that. I initially planned to have a transition to full black screen slowly and then have just text on the final screen of each ending, but I had no time to do that during the jam, so it was dropped.
I also want the achievements popup to say 1/3 or 2/3 achievements earned, so the player knows that more endings are possible to get in the game.
My Thoughts / Reflections
This is one of my most relaxing game jams. I actually slept, bathed and ate normally. I didn’t feel that pressured by time until the last day, when it got pretty crazy. But it was still pretty chill. It was my intention to not want to sacrifice my sleep or take it too seriously because it was just a tryout and I was already late to the competition anyway, so I just wanted to take it with a more relaxed mindset as opposed to feeling frantically forced to work at a fast pace. I think we all have had enough of that in life already 🙂
And yes, I was late because I was confused by the actual competition’s start time due to different timezones. I thought I still had time to sleep before starting, but it actually started way earlier than I anticipated. I didn’t even have a team so I actually only started asking all my friends if anybody was interested to join me. And this was AFTER the jam had ALREADY started, and having to explain to everyone I asked that this was a super last-minute thing. I was half not expecting anybody to be able to commit on such sudden notice. Only one friend was free enough, Chris, which I am grateful for.
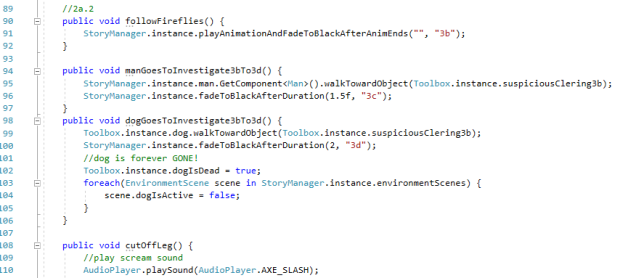
This being my first Ludum Dare, I was expecting to make many newbie mistakes too. But so far it was pretty smooth. I think having created lots of games before and having experience helps. As I was on Youtube reading and looking at other peoples’ jams, I saw that a number of people actually failed to submit – they just didn’t know how to fix their bugs, encountered problems with their project or simply faced technical issues that stopped them from making their game. So I am definitely happy with what we made and it really is something to celebrate to be one of the 2500 games in the world that made a game for this competition, given how little preparation we had. There were bugs on release definitely, such as the character getting stuck in the environment.

(Which I’ve fixed.)
And the dog spawning in weird locations and falling off screen.
(Which I’ve also fixed..)
And a bug where the blur caused by depth of field did not get disabled.
…
Was that list of bugs ever going to end? Anyway, so what did I learn from this experience?
Expanding my Design & Technical scope
This is not the usual type of games I make. I have a preference for creating games with fun gameplay and a sense of progression, but I didn’t want to always work on familiar territory and genres or topics, so teaming up with Chris, and in joining this Ludum Dare, I get very curious to see what games other people would make too with the theme. This way my scope is expanded, and as mentioned above, I may be using familiar tools (Unity, Animator), but I’ve used them in new ways to create things that are normally not required of my projects, so this is a good learning opportunity for me as well.
While I could have gone solo, working in a team almost always provides better quality results, and is especially important during the design and feedback phase.
Animation Skill
This jam also lets me practice, train up and apply the animation principles I’ve learnt in the past year while studying Animation. I doubt I would’ve been capable of creating these animations without studying proper animation techniques prior. To make simple cubes look good, you have to think outside the box. Ha ha. Squash and stretch, easing in and out, staging – you’ll see those at play for many of the scenes and character animations created – I want to inject life into lifeless black and white cubes and make it feel good to look at them.

This project is a reminder to myself that animation isn’t just about making something move or performing an action for the sake of it. You want to make that behaviour look obvious, readable and the action interpretable by the player, without leaving him confused as to what he just saw or leading him to the wrong focal point. Moreover, you want to aim to have the animation be pleasing to watch if possible.
My favourite one is the dog circling animation at the start of the page which plays when you offer to share food with the dog (the other smaller cube).
The way the dog appears to bob up and down excitedly, pouncing around in circles. He’s not just moving and rotating in a circle around a point which could’ve been the easy way out to ditch animation quality for time in the game jam.
The ones that got me spending the most time on was animating the final wolf scenes. Here are spoilers of the animations.
Okay so I am not an animation expert but these were what I did to make the scene’s animation as believable as possible. Having some anticipation action before the wolf lunges forward prepares the viewer for what is about to happen. The stretching of the wolf as he’s in the air and the squash as he gets hit by the man’s weapon exaggerates the impact and action. The man character leaning forward in the direction he is jumping toward gives him weight and makes the jump believable as you can tell by the posture where he is jumping toward even if it were to be a still picture. The man swinging the weapon backward just before he strikes the wolf makes the swing look more powerful as it looks like the energy has been built up. The big wolf’s rocking body as he struggles to get up when he’s overturned makes him feel heavy and stuck. And overall staging makes sure every character’s animation is the focal point at the right time and will be read by the audience. Usually only one animation should be playing at once and sufficient time should be given to ‘register’ an action, so that multiple animations don’t overlap and fight for the audience’s attention. (However, above there were some parts where the animation overlapped after I made a last minute edit that slightly screwed the timing). That’s animation in a nutshell and if I did it well, I will have to thank the animation professors who have taught me.
The best part of these animations is they were all just to do with rotating, scaling, and moving of the objects and all done in the engine without the need to go back to Maya or the 3D modelling software. No need for complex blend shapes or rigging (setting up of a skeletal joint system for characters) so in terms of the technique itself, there was nothing fairly fancy and complex which is perfect for a game jam as it is simple and saves time.
WHEW and that was how I spent my 3-day weekend. With all that done, it was time to get some rest, and look for the next exciting project!
Oh, and if you’ve read this far, thanks, and please consider rating the game HERE as every game needs at least 20 ratings to be qualified for a score during the results announcement in January 2019. And also maybe try out the other games. Ludum Dare really spawns some creative ideas out of people and some of the top games of past competitions are really creative!
