Making an Idle Game Part 9 – Cutscene Work & Optimizations

In this post I will mostly talk about some of the stuff in Unity. They probably aren’t too technical if you’re familiar with Unity, but for most people who don’t make games, I’ll just mark it as ‘technical’ since it may contain some jargon.
Aside from that, this is also a continuation of the previous post and I will talk a little bit about the cutscenes I had worked on.
Cutscene FX

Oh, here’s something I did for a particular space scene. I felt that for this scene, I wanted to have the ball look like it was shot out from something like a wormhole to denote that it is coming from another dimension. Without the wormhole, it looks like it just came from outside the camera and came into view. But I was a little tired to go back to my scene and add a wormhole, so I drew it as a separate asset and got the idea to animate it in Unity, using a particle effect system:
The above is not how it looks like in the game since and was just a quick test. I think the wormhole with FX may look better than just being a static object which I had originally made it out to be.
Level 150 Storyline Boss
I also drew a new boss! Yeah!

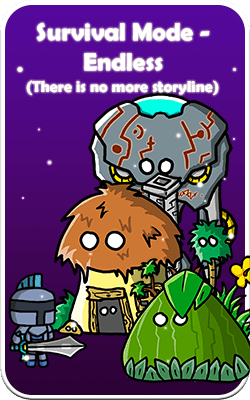
Survival Mode
I had been planning to make the game have an ending. Zone 201+ was meant to be for people who wanted to continue playing the game, and I wanted to make it clear that there was not going to be any more story content past that, so the game had to be split into what most games do – have a campaign and survival.
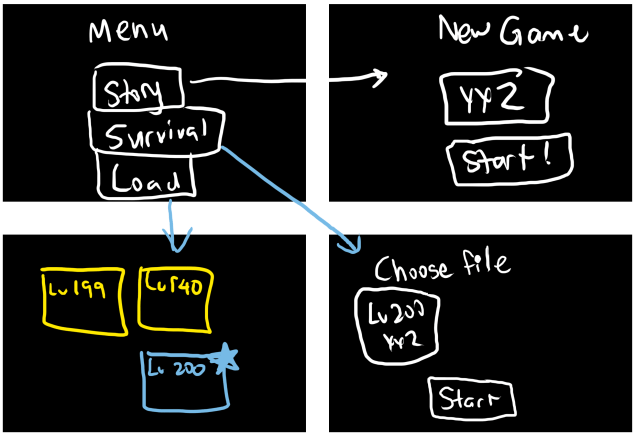
I had a few ideas but it all ended up really convoluted and confusing, especially because I the game has 5 savefiles, 1 autosave, 6 cloud files, and then trying to make another type of ‘survival save file’ ends up just making a mess of the entire thing because there now has to be two copies of every single savefile. Then I need to think of whether I need some kind of “Load Story Game” and “Load Survival Game” in the menu? It was awkward design so I ended up with something simpler – just having a submenu after choosing a savefile to load.
After completing level 200, the savefile will be marked as a survival save file and you can only play on in survival mode.

There is nothing special for survival mode, though I did at one point considered changing the Level 300 boss to something. But I didn’t want to give any hints that there would be any form of storyline continuation, so I decided not to add anything to survival.
Unity Canvas (technical)
When making my cutscene, I had to decide what kind of canvas to use. In Unity, you would likely have to use a canvas – a canvas is something which contains all your UI objects (buttons, panels) and in your 2D game, it can contain images like your character sprites.
There are three types of Canvases in Unity and I had to think carefully about which was the best canvas to use for my cutscenes. Each canvas has its pros and cons which I was considering.
The three types of canvases in Unity are:
- World Canvas
- Screen Space – Camera
- Screen Space – Overlay
1) World Canvas
The World Canvas is good for a lot of things. For reference, a world is basically where you put all your primary objects like your heroes, and enemies.
Therefore a world canvas is good for making UI part of your world – eg health bars over the enemy, floating damage numbers text. It’s the canvas I use for my main game.
However, there are parts of the UI that I don’t want to be part of the world. Things like the Gold UI and text should not be part of the world.
This is what screen space overlay is for.
2) Screen Space Overlay
For my Tower Defense game, I had to switch to using a Screen Space Overlay. Unlike the World Canvas, screen space overlay is put ON TOP of everything in your world. It’s perfect for UI.
For my Tower Defense, I move the camera a lot. It pans to follow an object, has zooming in and out…

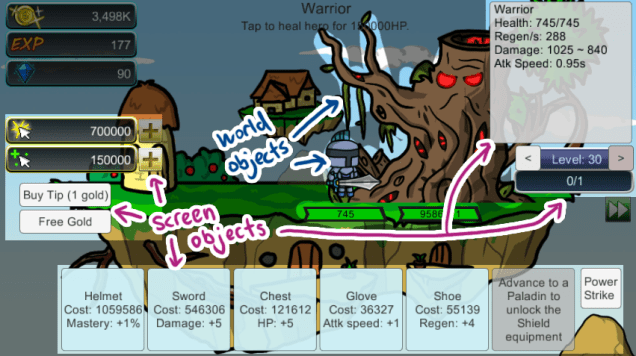
Above, you can see the UI on the right does not zoom in and out with the camera. If you use a world canvas, objects will behave like world objects do, and zoom in/out, which is not what you want for your screen UI. In this case, I would use a screen space overlay for such UI.
3) Screen Space Camera
Screen Space Camera is like Overlay, except that since it isn’t an overlay, you can render stuff on top of the Screen Space Camera, which I primarily use if I want to have particle effects on top of the UI, like glowing sparkly buttons.

Because the Screen Space camera requires a camera, this allows me to do very specific camera stuff and special tricks.
For example, I can have a camera that only draws UI and another camera for everything else. I can even set up a camera for a top down shooter game that only draws the background and characters and not draw trees or enemies – useful if I want to make something like a game mini map.
The reason for having a specific camera to render the UI is because if you have a side scrolling platformer game, and your camera moves with the character, you don’t want to re-position all your UI all over again as the moment an object’s position changes in the game, you will have to recalculate its collider, bounding box, and apply physics to it (if you have physics rigidbodies on your objects). Therefore, when using Screen Space Camera, I set my UI to a separate stationary camera that does not move with the world camera.
Conclusion
In the end, I went with a totally different approach. I decided not to use the canvas for my world objects, and use a World Canvas only for the UI in the scene. I put characters and heroes and other objects outside the canvas and grouped the objects by the Cutscene they are used in.

Draw Calls (technical)
Another part of optimizing the game is to reduce draw calls, which I had done quite awhile back. I also did something in the game to help decrease memory consumption further (the game currently doesn’t use much memory while it runs anyway, but this may help on older PCs)
What is a draw call?
To draw an object (like a character) on your screen, the engine (unity in this case), has to make a draw call to the graphics API, which interacts with the GPU and “tells” the GPU what to draw on the screen – at least that’s the definition I read.

So if I had a hero that I want to render on the screen, Unity would get the texture of the hero, call the GPU and tell it to draw it on the screen. (To be accurate and according to Unity, the call is made to the graphics API like OpenGL, which interacts with the GPU)
But if I had another object, like an enemy on the screen, now I have to make two draw calls every frame. If I put in a background, I would need three draw calls. Here is a picture that starts out with a white wizard character and I slowly add objects to the scene:

However, if two sprites share identical textures, then no additional draw call is needed. Think of it as only one draw call would be made to the GPU, and it would be told to draw the texture thrice, at position A, B and C, rather than making three separate draw calls each time to draw the object. (this assumes all the objects share the same material). So if I add more enemies to the scene above, the draw calls made would not increase.

Draw calls are expensive and can be taxing on the CPU (and make your game lag), so you would want to reduce the number of draw calls in your game as much as possible.
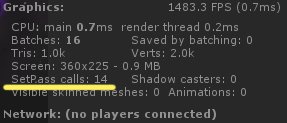
In Unity, draw calls are also known as ‘setpass calls’ and the number of calls being made can be seen in the editor. In the picture with the white wizard I gave above, it is possible to reduce the draw calls from 3 to 1 – the background, the white wizard and the 3 bush enemies can all be drawn with a single call, thanks to something called the Sprite Atlas.
Sprite Sheets and Sprite Atlases
If you’ve tried making a game before, you would know of spritesheets. If you have a character walking animation containing 5 frames, and if they were five different images, the engine would have to make a separate draw call each time you want to change the frame – from frame 1 to frame 2, from frame 2 to frame 3, etc because it is using a different image.
But what a spritesheet does is no matter what frame your character is at, it is drawing the character using the SAME texture, and you don’t have to swap the texture to draw a different animation frame.
So all the engine needs to do is to tell the GPU to use the same texture, but draw a different section of it. Here’s my own neat animation of how spritesheets work, using my warrior character:![]()
The engine slices your texture into different ‘boxes’ called frames and you specify which frame the character is on, and which frame to draw onto the screen. The slicing is done behind the scenes and is invisible to you, so you only need to specify the width/height of each box and the engine will ‘slice’ your texture internally.
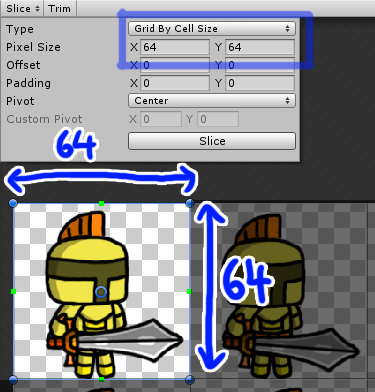
So even though my texture has 8 different character frames in it, at any one point, only one slice will be drawn onto the screen at once, so you can’t have two frames at once.

Moving beyond that, there is something called the Sprite Atlas, which is like a spritesheet. There isn’t significant differences between them.
Below is one of my Skill Atlases, which is one of the many Sprite Atlas-es used in my game. The skill atlas is a single huge image comprising of several individual textures. When I need to retrieve a particular frame or texture, I need to ‘download’ the whole atlas, and then retrieve the frame that I want.

I mentioned this in one of my previous posts and atlases work similarly to spritesheets, but you can pack a lot of things, even sprites that you may use for different objects or characters. Sprite atlases help to reduce the size of your game, the memory it uses (for WebGL). It is one step above spritesheets and can reduces draw calls since multiple objects will only require one atlas.
In the atlas above, I have three skills using this atlas – the blue Dragon Skin skill, the purple Weaken skill, and the yellow Slashing skill. All these 3 skills will only take ONE draw call instead of three as it normally would have been if I use just sprite sheets.
Also notice that the atlas above is square and is power of two (2048 by 2048 pixels). This is by intention as it allows the atlas to be compressed in a better compression format which further reduces memory consumption/ game size.
You can also enable rotation to pack the sprites in a more compact way so that as much of the 2048 x 2048 pixel space is filled up and no space goes wasted. If packed properly, this is a very huge gamechanger.
Memory consumption (technical)
This is very much linked to the topic above on sprite atlases and is pretty wordy.
I was looking into how the game is using its memory and a large portion of it is taken up by textures.
When a texture is loaded in the game, it takes up some memory. Bigger textures generally take more memory as each pixel of the texture takes up 1 to 8 bytes, depending on the compression format. Memory can be used up in other ways too – but for my game, 70% of it is by memory and you can see it in the picture.
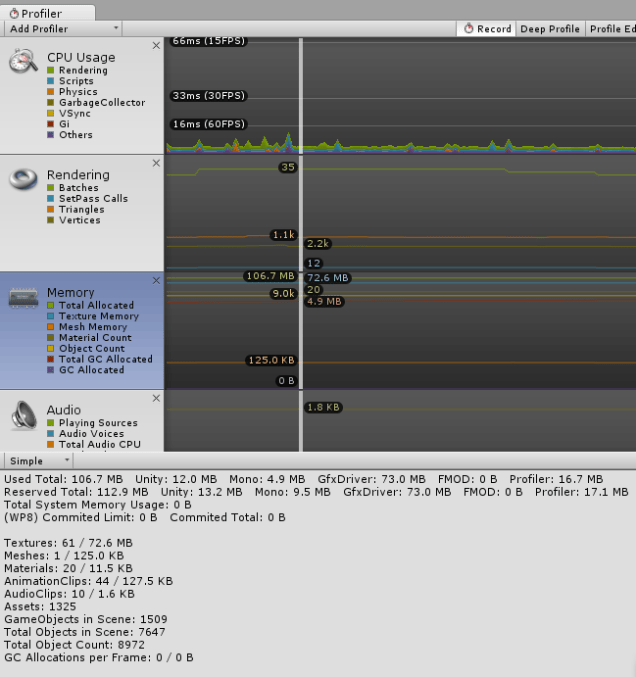
In the first line, it states that the game is taking up 106.7MB of memory (out of 256MB that the game is given). This is in the game battle scene, which is the busiest and most resource intensive scene.
Out of that 106.7MB, 73MB is used by the GfxDriver, which is mainly textures. So I looked at the breakdown in texture memory.
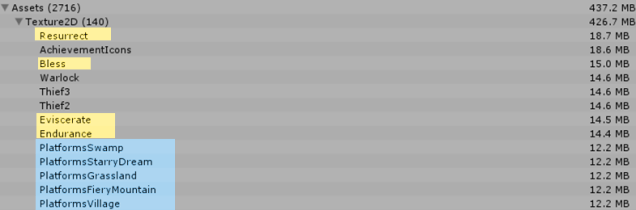
Note that the above table is a snapshot of the EDITOR memory as I can’t seem to get the values of the actual player. As such the values above are MUCH higher than in the WebGL player and may not be accurate, but it is the best I can use and useful for a gauge on what’s contributing to the memory usage. You can see that the highest contributors to memory (IN THE EDITOR) were backgrounds and skill effects.
I decided to trim additional transparency in the background. Although trimming transparency doesn’t help very much with file size since all it does is remove the empty pixels, doing so reduces the memory used by the texture. As for skill effects, I cannot trim their transparent pixels as much since they are spritesheets and each frame has to maintain a certain width and height for the sprite to animate easily as seen above in the SpriteSheets section.
In all honesty, it is extremely difficult for the game to actually hit the memory limit, which is set at 256MB currently, and my time is actually better spent developing other stuff, like content, or fixing issues. However, I decided to take a look and dedicate time for this.
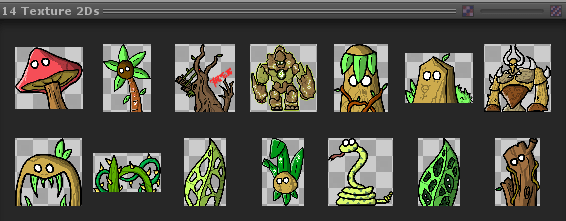
Above are my jungle area’s monster sprites. I throw them into an atlas below with the platform sprite (the huge tree). I’ve marked it in red because I’m going to talk about it below.
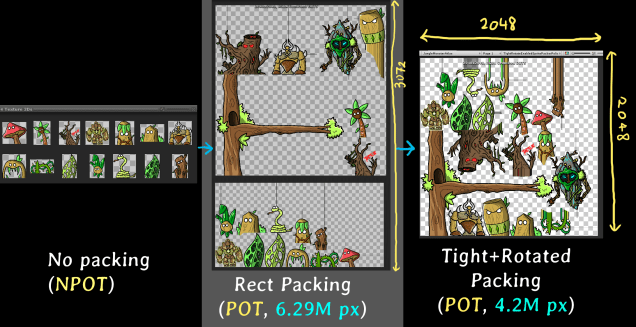
![]()
Two power-of-two (POT atlases are formed as a result and they are 2048 x 2048 and 2048 x 1024 px respectively. There is also quite some transparent space, due to the platform, (l have indicated the sprite’s bounds with a red rectangle) which shows that some “wasted” memory is allocated just to store the empty pixels in the texture. Can I pack them in a way such that I use the transparent pixels’ space? Apparently, yes! But it does come with some drawbacks.
Here’s a picture of the new atlas. Notice how the transparent pixels have decreased A LOT and they are packed so much more efficiently, and closer together.

In the game, I decided to change the way sprites were packed – and specified certain sprites to allow them to be packed with a tight rotation policy – these are mostly sprites like the platforms and monsters. Unity’s atlas tight packing policy will pack them with its own algorithm to make it space efficient. Packing sprites tightly reduces the memory taken up by texture, reduces the time taken to load the game and also improves performance as it gives the CPU more time to process other stuff rather than focusing on drawing stuff to the screen. A video here explains it much better than I can.
(I should make a game about optimization, and it shall be the opposite of an incremental game where you try to get as less pixels as possible! – Nah just kidding)
The tight rotated packing, while better than the default rectangular packing, does come with some drawbacks so I cannot use them for everything. I therefore have to specify some sprites to continue using rect packing. OpenGL may also handle rotated sprites differently and cause the sprite to look different if it applies additional anti aliasing / artifacts during the rotation process, but thankfully I don’t notice a noticeable drop in the sprite quality so far.
I also changed the way skills were packed and not pack frequently used skills together with infrequently used skills. This is because if you pack them both together, then whenever you cast a frequent skill, you end up loading the atlas of the infrequently used skill.

The above is the atlas for a skill called Wisdom. It has a high cooldown and can be cast quite infrequently, so I have given it its own atlas. This atlas is destroyed if the skill is done casting so it does not persist in memory, but has to be reloaded each time it is cast. I might change this if the reload actually causes a noticeable lag, in which case it is better for such textures to remain in the memory. Again it all depends on how frequently the skill is cast and thus how frequently the texture has to be (re)loaded.
This was done for the other less frequently used skills which were given their own atlas, and packed with a tighter policy. And when these skills (mostly buffs) are done casting, I remove the texture from memory. This will cause some overhead if I try to load the texture again, because now that it is gone from memory, all references to the skill’s spritesheet is DESTROYED, meaning that if I were to cast this skill, I need to reload and re-create the texture to put in memory again, which takes up CPU. And that is the tradeoff here. So although destroying a texture after it’s done frees up memory, I only do this for skills with exceptionally long cooldowns or are cast infrequently so that when it does not interrupt the game too much.
In the end, I decided not to destroy the texture after it is loaded, as the game consumes very little memory and hardly hits the 256MB limit unless you have played for a very long time, and I’m not sure if the performance tradeoff is worth it. However, the improved packing still helps to decrease memory usage and draw calls as the atlas is split more efficiently.
