
It is now Day 10 of my journey of making a Tower Defense game. Read Part 1 here and Part 2 here.
Creeps Completed!
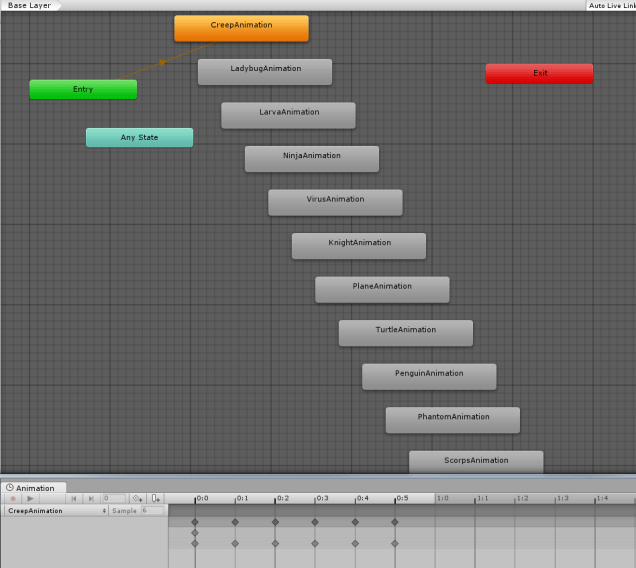
At last, I am done with the creeps! Everything from coding, implementation and its art/animations are more or less finalized! AT the moment, there are 14 creep variations, each with their own animations and abilities. With creeps in place, the next thing I had to do was the Wave UI.
Wave UI
The Wave UI serves a very important purpose – to display the upcoming wave information – creep type, health, gold, speed, description and its special ability stats (if any).
I first coded the wave boxes to move from right to left.
It was very buggy at this time of this screenshot, but there is a very neat shuffling animation. Basically, instead of ALL wave boxes moving together, they move one after the other. I think this is a really neat effect that though is small, adds that nice touch to the UI.
Everything was not smooth sailing. This wave UI is really one of the harder things to code so far It was deceptively simple, but complicated.
There’s this problem I had was that I never create my enemy before it is needed, so there was no way to obtain information about the next wave of creeps without first spawning a creep!
It would be cheap to simply secret spawn a creep without the player noticing, get its stats, then kill it, but it’s not a very clean approach and very hacky.
Of course, there are many ways to get those information without spawning a creep – like moving the functions that calculate HP value of a creep of a particular type at a particular wave number to somewhere more accessible. But these functions cannot go into my EnemyScript because the enemy isn’t spawned! Sure, I will have to put it in something like the WaveManager or GameManager. But to me it seems like counter-intuitive design because the Enemy will end up referencing another object to get its own HP value. It’s like the enemy doesn’t know its own HP and has to ask another object.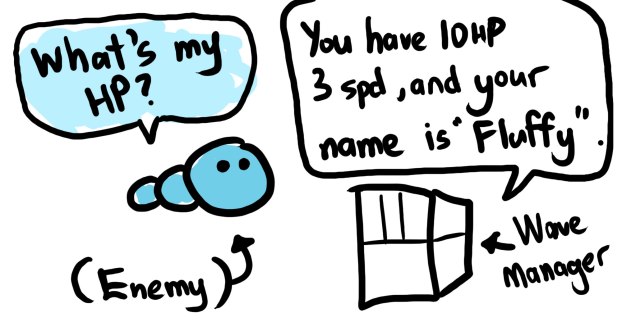
I even tried setting and obtaining values from the Enemy base Prefab and boy was that a horrible idea. For those that don’t know what a Prefab is, it’s like a ‘base’ object which you can create multiple copies of, like bullets or enemies that are created multiple times and destroyed. What happened was that I ended up CHANGING the base prefab, essentially “corrupting” it and every enemy that spawned after it had its values OVERRIDEN. Of course, I did try to set it back in code, but it got really messy and weird shit started happening, so I gave up the idea.
I didn’t know what the best practice was so I decided it was down to preference at this point – I am after all, the game designer and I have to be comfortable and understand my own code.
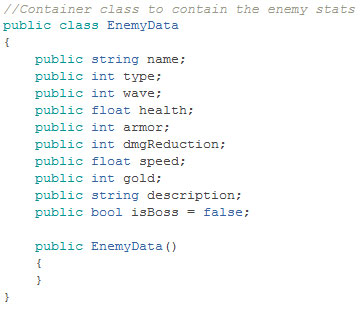
My style is to use a DummyEnemy. This dummy enemy is actually not an actual enemy, but an empty shell containing the EnemyData class, a new class which I made to store every important detail that is needed for display in the wave UI.
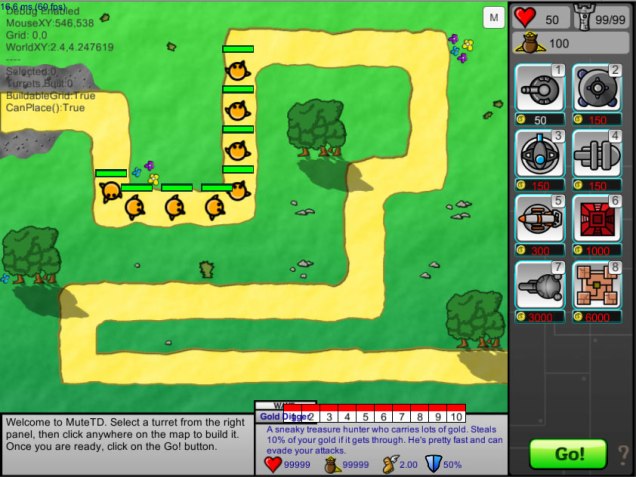
The DummyEnemy can be initialized to ANY enemy type, and it will simulate the stats of that enemy. There may be a better way to code the wave UI, but I think this works very well for my game, plus I even intentionally allowed this ‘dummyEnemy’ to be seen by the player in the wave Info UI:
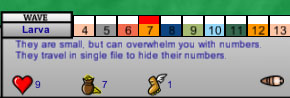
You can see the dummy enemy at the bottom right. It also plays its walking animation! HOW SWEET IS THAT? I totally didn’t intend to make the wave UI this fancy. Oh and by the way, that screenshot was 2 days after the first screenshot of the wave UI, so most of the bugs are fixed. I even got the wave UI to display the correct color codes of a creep and indicate if it is a boss wave!!!
I was really happy to have not only a working, but very polished Wave UI that may look like it will stick until the final game release.
Upgrade animation!
When upgraded, towers now get a green upgrade animation. This came out of necessity because I couldn’t tell when my towers were upgraded even though I was pressing ‘U’, there was no visual feedback on the tower being upgraded other than the damage numbers in the UI changing.

Target Priorities!
Turrets also get target priorities – whether to attack the first or last enemy, etc.
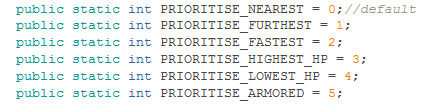
I was very reluctant to do this at first, but the variety of towers I have and the creep enemy specials means that I have to give the player the option of specifying what targets he wants his turrets to attack.
The coding ended up being so much simpler than I thought. I already had the script to target the enemy nearest to the exit, so I just reversed it, and made a bunch of if-else statements based on what target priority setting the tower has.

In fact, I was just copy-pasting the if-else statements for the code that it actually got boring to implement this feature. Nevertheless, I’m glad I get something easy to code once in awhile. It was a great break after coding the wave UI.
Map Generation
There are multiple ways to code the creep’s movement path in TDs. From using pathfinding AI to simple waypoints, it all depends on what kind of game you are making.
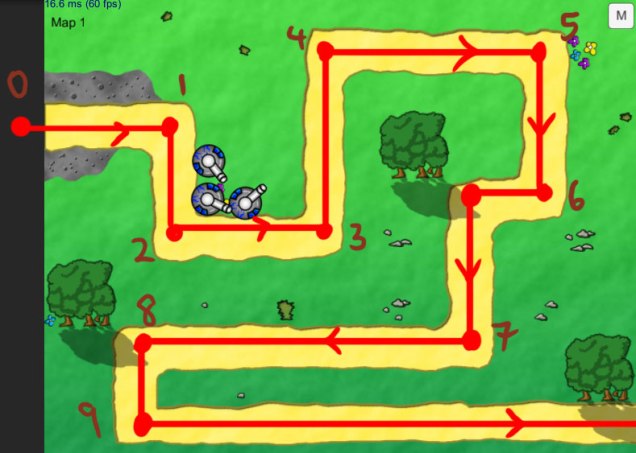
My game does not require dynamic path generation, so I used way points. It is always better to keep your game simple whenever possible.

Here, you can see that I am already starting to introduce multiple levels into the game (art in the screenshot above isn’t finalized). I started by first ensuring that I can dynamically create map graphics easily. Coding multiple maps is a matter of using 1 and 0, so if I create new maps, the bulk of my time will be spent on drawing. In my first ever attempt at Flash TD, I used tiles as a quick approach to render the map. The result was pretty ugly because it looked so… systematic. And using gridded tile graphics may make your map look artificially generated and repetitive. Nothing bad about that, but I wanted my game to look pretty, so I draw custom maps manually.
But can manually drawing be simplified?
Yes!


Applying a set of filters and stuff actually makes me able to draw dynamic pathways easily + look good at the same time without having to resort to grids. All I did to draw those paths was literally pick up my stylus and just draw a path on my WACOM tablet, like how I would draw on paper.
I guess that’s one of the really godly things about having your own drawing tablet.
Although it looks easy, drawing maps still take time. The pathway takes a very short amount of time, but the map itself is very tedious – at least 30 minutes to an hour or two. Why? Because I want each map to try to use unique environment art. I mostly try not to use the same trees. No doubt some environment art will be duplicated, but I try to draw different trees and stuff for each of my maps.
Once the art is drawn, I add finishing touches like lighting and shadows to the map and the new map is ready to be implemented!
Yes, manually drawing maps is tedious, but I think it’s worth having pretty maps especially when it occupies 80% of the game screen, plus it is pretty fun! This of course, depends on the game’s design. I don’t intend for my game to have many levels so this design approach works fine for my game.
The HERO character
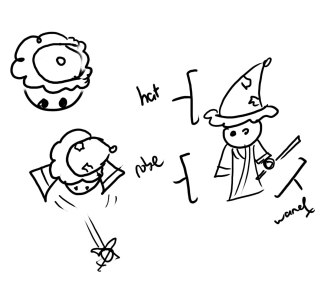
I have also begun work on an optional feature – the Hero character. The Hero is meant to be unplayable in my TD – just an invisible character, but I may add him in as a bonus playable ‘turret’ on his own!
At the moment, only the art is done and very minimal coding. You can call your hero to the map and hell, you can even put 10 heroes on the map because they don’t cost anything.

I have a HAT graphic that is not shown above. If I do implement equipment (super low priority), the hero hat object has to be stored separately because I will have to swap out the hat graphic when necessary.
I have LOTS of design work made for the Hero. In fact, I have MULTIPLE designs. And I’m not sure what the best way is to make the hero work in this game, so I have disabled the Hero feature temporarily.
I also have a backup sprite and side-view attack animation from Idle Heroes for use in this game.
Though I have about 50% of the hero coding done, and even have the hero sprite and idle/attack animations completed, I want to work on other more important features and the Hero is not a priority. At this stage, the balancing and game’s main reward system is more important.
As the game grows and there are more and more objects and states, many potential problem can arise if you are not careful.
Game Flow (Technical)
Unlike Flash game programming, in Unity there is no fixed order in which your game’s objects are created. In Flash, I create objects as and when I need and doing so lets me determine the order in which things are ‘created’ in the game. For example, I have to first create my map before I go on to create the enemies because the map stores important unique data like ‘number of waves’. Without knowing the ‘number of waves’, other scripts like the WaveManager or enemy spawner do not know how many waves the level has and the game runs awkwardly.
In Unity, Game Objects in the scene are created in a random order. That means if my map is created last, every other object referencing the map will get inaccurate values and the game behaves unexpectedly or worse – crash. But usually it just produces unpredictable results – and people refer to them as bugs.
So it was very important to use something called Awake() to determine the priority and order of the objects I am creating.
Awake() is the very first thing that happens to every game object and by using a single object’s Awake(), I can use it to call other objects in a specific order.
This is how my game flows currently:
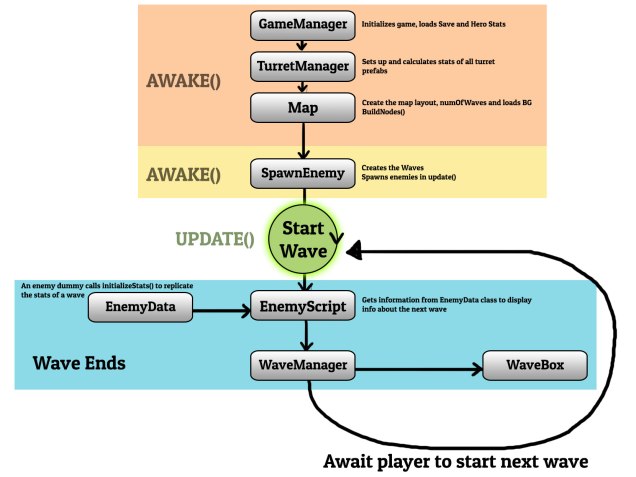
Since this is my first TD, I realized that there are some things I could have coded better. If there was one thing I would change, it would be to create my waves in WaveManager rather than SpawnEnemy, which might have solved my problem above about getting an enemy’s stats before it is spawned. It’s a bit too late to change it, so I left it alone.
Here’s how the game works: First, I get my Hero. He has very crucial stats I need to reference for my Turrets, such as turretDamageMultiplier. If he has 150% turret DMG, that means my turrets have to store damage values 1.5x their base damage. These values, once set, do not change when the game runs because they are base values. Any additional temporary multipliers will act on these base values, such as buffs which I may code, like x2 damage for 30 seconds, etc.
Then I create the map where unique data such as ‘number of waves’, background are set. This way, the SpawnEnemy script is safe to start generating the waves necessary for the level.
When all this is done, the game runs START() on all the other non-crucial game objects and the rest of the game flows.
The game has to flow in a very systematic approach so whatever happens is predictable and having a clear flow chart will actually help me in debugging to know what went wrong and trace the problem as close as possible to the source.
Game Flow (Design)
Now that the technical part is over, I have reached the stage where the game is starting to expand outside of its play area. For example, the introduction of multiple maps to play means I need some sort of level selection screen or menu.
For the past week, every thing I have coded, drawn or animated is reflected in one scene(or one screen) – the Play State, a singular scene where all the playing occurs.
There are other ‘screens’ I intended to introduce to the game, but only when the game really needed them. I don’t want to pre-create screens that are outside the current scope. Such screens include:
- Main Menu screen
- Game Over Screen
- Level selection (medium feature)
- Statistics screen
- Skills / Upgrade Tree screen (big feature)
In my previous blog post, ‘Making a TD Game Part 1’, I said that I had 3 game scopes, and now I am starting to actually implement features of the ‘Medium Scope’ – aka the things that are ‘nice to have’ in the game, but not necessary to make it playable. These are mostly content-based features, which are exciting to make, but jumping in too soon without planning can be disastrous, so I charted out briefly how the game states transition from one to another.
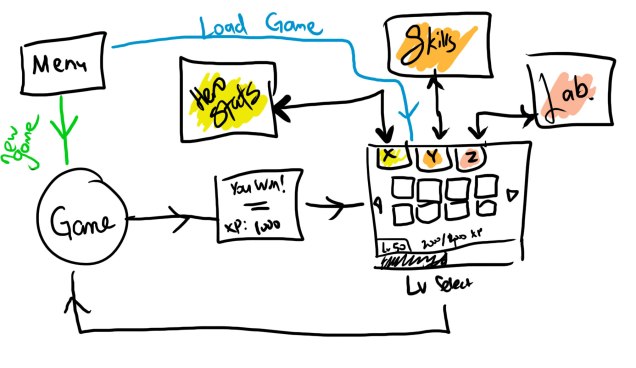
Again, I arrived at this chart after analyzing other games and how they flow. It was pretty fun to go to some games I played and restart, looking at how they introduce the player to the different ‘screens’ and what order in the game they appear in. I feel games are better off gradually show more stuff to the player rather than overloading them with so many screens, especially in my game where it may have the potentially to overload players when they finish a level and suddenly there’s up to four different buttons that take them to four different screens. This can overload and confuse the player – which buttons takes them to the next level? What do they press if they want to replay the previous level, etc has to be made obvious.
I did this unlocking design mechanic in my game OldStory and the longer players praised its design, saying that it was great to have more content unlocked as you got deeper into the game. It’s like when they think the game has nothing left for them to do, suddenly a whole new feature and range of options are unlocked and it’s exciting.
The following is just my opinion, but when a player just started, he isn’t interested to see everything your game has to offer. He first wants to learn how to play the game. And only when he becomes good at it does he start to want to explore and want to learn and see new features. Content is best generated only when it is needed. Which brings me to my next point.
Designing the tutorial…if there will be one?

Rather than using words, visuals or even animations are great, but take effort to make. I would normally try to use as little words as possible because the truth is that most players will NOT read your tutorials. Even as a player myself, I skip games with super long text and tutorials. That’s why my game literally has no tutorial. The first form of a tutorial is actually in an optional-to-read text that can be read at any time. I put somewhat useful tips there, but for important details, I make it clearer.

The first compulsory tutorial I added is a quick animated popup drawing attention to key elements of the UI which appears only at the 7th wave, giving the player enough ‘breathing space’ to explore the game on his own.
I also lock and hide unecessary elements of the UI when the game first starts. The game displays only 2 turrets out of the 10 available when you first start the game. The minimalism effect worked really great because I could focus on what was important – the two turrets I can build. (Even the starter Hero character is locked from the start when you first play).
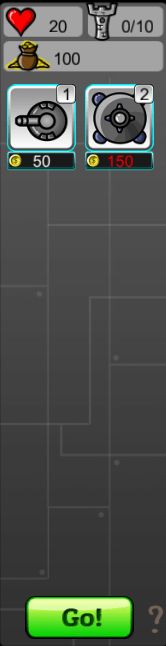
Notice I also color coded the ‘cost’ text to turn red when it is unaffordable, just in case the player attempts to try to build the second turret and wonders why the button doesn’t work / the turret doesn’t build.
Of the two starting turrets, the second turret is too costly to build. I intentionally made it cost 150, and give the player only 100 starting gold. This is because I want the player to build the first turret – Basic Turret – to first understand how turrets work. The second turret has advanced properties (multi-targetting) that the player may not understand yet until he progresses a few waves later and earns enough to buy the second turret.
I somewhat learned this from a Plants vs Zombies video I watched where the designer explained that he made Sunflowers cost only 50 Sun and Peashooters costed 100, which somewhat ‘forced’ the player to build more Sunflowers so he can farm more suns, which was what the designers wanted players to do because he noticed playtesters skipping sunflowers and putting peashooters when they were equally priced, causing them to eventually lose the game iirc.
While my game doesn’t have that kind of penalty where you lose if you don’t build the first turret first, I want the player to first learn the basics before moving on to using turrets with special traits.
So the next time you play a game like PvZ, you might look at the cost of towers and think those numbers were made up randomly by the designer, but watch – some games put a lot of thought into these seemingly ‘random’ numbers.
Victory Screen
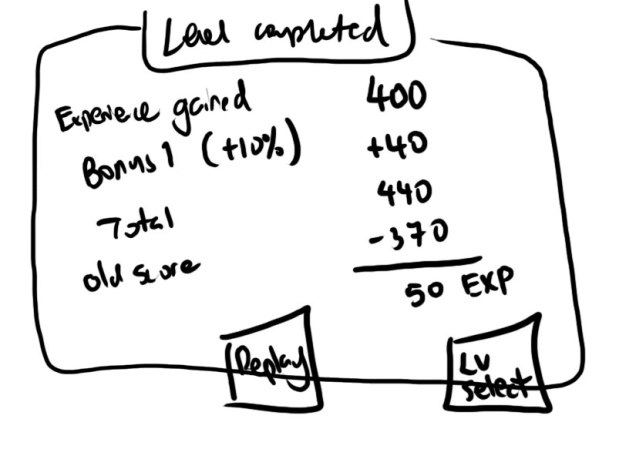
With the game getting in the process of being balanced, I added a non-quickplay mode which has limited waves and is the foundation for the game’s main mode of play. And what happens when the player wins? There was nothing rewarding the player for the past 10 days! That’s why I need a victory screen!
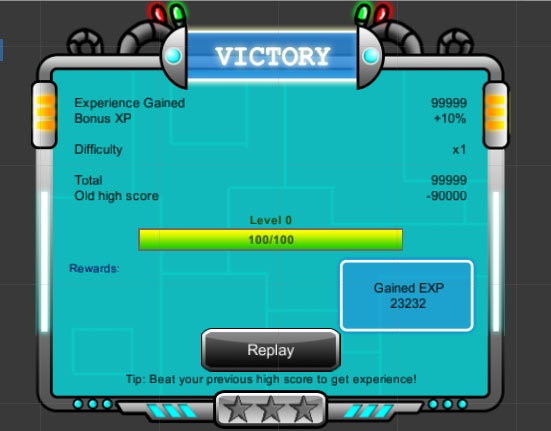
I adapted it from my Space Shooter game’s victory screen and modified it for this game. I went from ‘concept art’ to ‘sub-par end product’ in like a few minutes, then spent the next few hours with implementation. Based on how the game goes, the victory screen will change to display different things.
Game Balancing Pt II
I spent an entire night figuring out how to make the values in the game work.
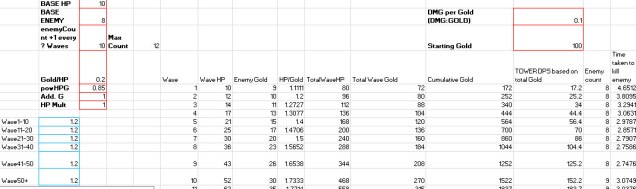
I enter my values in red boxes and this updates a very long table containing every single detail about a particular wave. On the top left, the values I can set are enemy base HP, base enemy count, base enemy gold, and powerHPG which I will talk about later. The blue boxes indicate the creep’s base HP increase from the previous wave.
On the right, I set the ratio of DMG to Gold for the turrets, and the player’s starting gold. Starting gold seems insignificant, but watch how it affects the graph below.
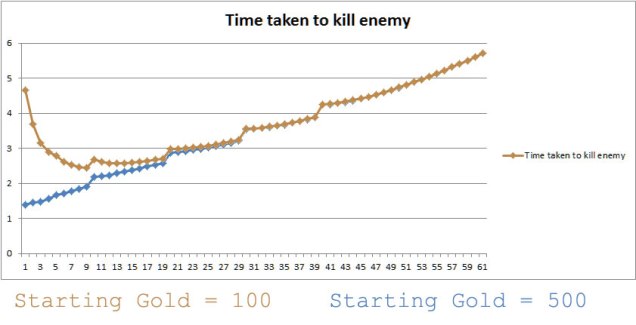
Starting gold looks like something that simply affects the y-intercept, but a high starting gold can actually turn the tide from a difficult early-game to a super easy early game. It turns a bell curve into a linear one. It is simply one of the most overpowered values that is used for early-game difficulty adjustment.
But it is a very hacky way to change early game difficulty so I avoid using it.
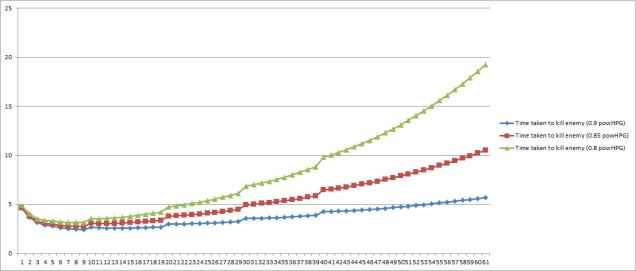
powHPG
powHPG is a very important value in this game. It stands for power of HP to Gold. It controls the difficulty curve to a large extent and when doing my balancing, I extensively fine-tune this value because every other variable’s effect is largely based off it.
Watch:
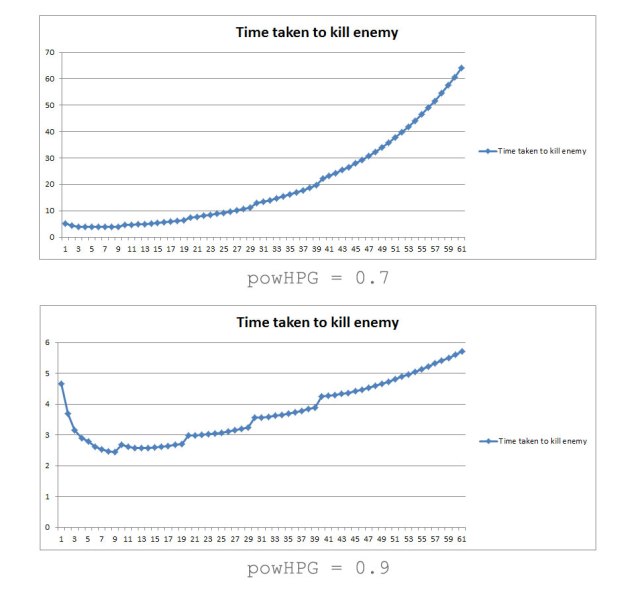
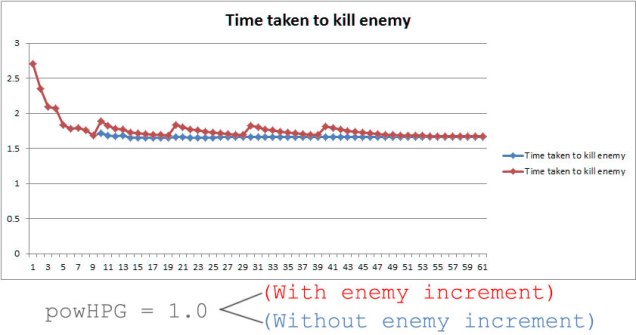
powHPG goes into my formula for calculating creep gold reward and a tiny change will greatly affect early or late game difficulty. There’s also a staggering effect in the second picture which is not caused by powHPG, but by the enemy count increment variable, which increases the number of enemies spawning in a wave by 1 every X waves:
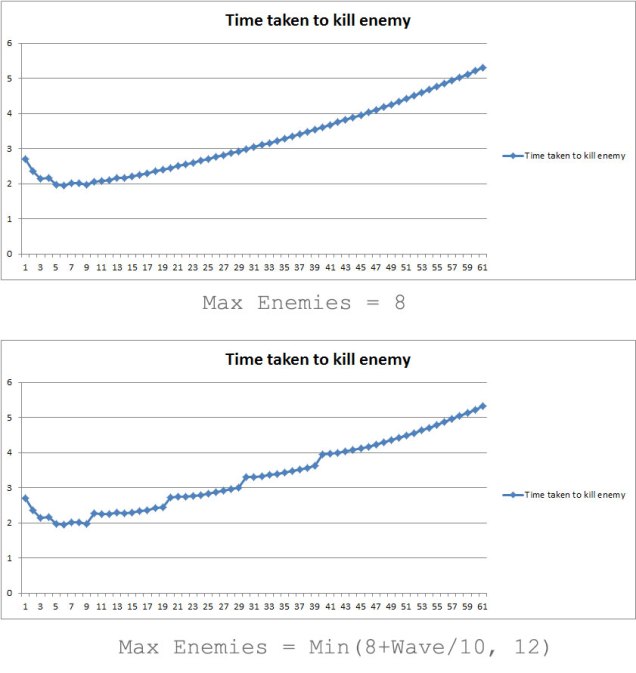
This staggering effect creates a difficulty bump in the game every X waves that gradually eases back to normal difficulty (because more enemies = more gold, and the effect cancels out the initial additional difficulty boost).
By also adjusting powHPG, I can decide how difficult early game vs late game is. A higher powHPG has the tendency to make early game battles comparably harder while a lower powHPG increases the difficulty of the late waves more.
The problem I had was trying to balance both of them out and it took a lot of value setting and testing. It was such a pain because I was actually discussing with my friend what the best way to handle this was.
Despite having a lot of variables at my disposal to tweak, early game difficulty was always too high. You might think ‘why don’t I just decrease the starting HP?’. Well, decreasing the base enemy HP was a perfect solution for smaller maps, but didn’t work very well on big maps with 60+ waves because the difficulty scales up too fast regardless of how high or low I set the base HP as.
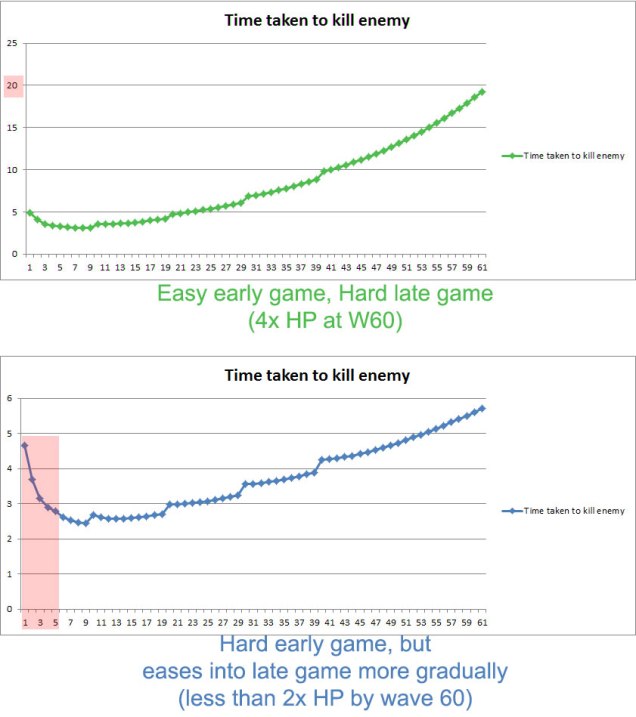
My current solution to fix early game difficulty being too high and fixing late game difficulty scaling up too quickly on bigger maps may be to set powHPG individually based on the map’s size and level. I noticed that a powHPG value between 0.8 and 0.9 work best.
A low powHPG value is used for early game smaller maps because there is a low threshold where gold dropped by enemies falls short of gold required for damage upkeep. This means enemies can afford to grow more in power per wave, and the easy early game is great for beginner levels with very few waves.
A high powHPG value is used for bigger maps which have more waves. A high powHPG eases the growth of enemy difficulty more gradually by allowing late game enemies to drop more gold. This makes it easier to reach and survive higher waves, but can have an added negative effect of making early waves harder – I intend to counteract this effect by introducing skills that increase the player’s starting gold and decreasing the cost to build starter towers. These skills will be more viable late game where I may use maps with higher powHPG.
Other solutions I explored were altering the health Multiplier increment per wave, but I wanted to fix those values at a constant 1.2 (+20% HP per wave) and changing those are a last resort.
The reason why I spend a LOT of time and math balancing was because my previous game had literally no balancing work – I put it off to the last minute and the balancing problems became too late and complex to fix.
After spending so much time on balancing, I hope I do not have to tread this territory again, but I think over time, the game will change and have to re-balanced, but this should keep the game pretty balanced for the moment.
Once I have decided on the values, I think this will be the last thing I will do before I step out onto officially starting implementing content from my Medium Scope!!!
Anyway, I am coming to the end of this post, so I’m putting miscellaneous pictures that I don’t really have much to talk about.
Behind the Scenes
Here are some other behind the scenes work.


(Coming Soon) Skill Tree?
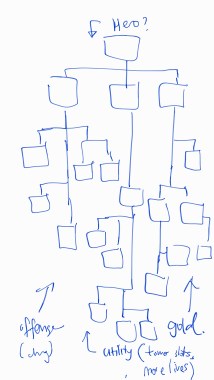
Also a concept idea of what I may be adding soon ^
Time flies
Time has flown since the start of this game. 10 Days felt like a long time since the game was in its infancy.

I am definitely looking forward to what this game will result in a week from now!
