
This is part 4 of my journey in the making of a Tower Defense game! (I’m editing this post and adding more pictures as I go so check this post again after a few days and I will have added new updates!)
The game is currently expanding beyond the play area. I have begun adding new scenes /screens to the game!
Mainly, there will be many more screens, but currently, the game has 3 different screens: PLAY SCENE, LEVEL SELECT and UPGRADES.
I also worked A LOT on the map art. I try to only draw when I am really inspired because that’s when I get creative and really bizarre with my map art and ideas.

Above are some of the map types I drew for my tower defense. Although I do not divide my world into iconic areas like I did for Introvert, I do have maps for a Grassland, a rural village, Ocean, and I’m not sure what to call the red-tinted maps – The Burning Lands? The Scorching Plains? I’m bad at names, so if you got any cool ideas I welcome them.
My backgrounds folder is starting to get heavy too.
I try to put as much detail as I can in my maps, touching it up even post-production after I have put them in my game.
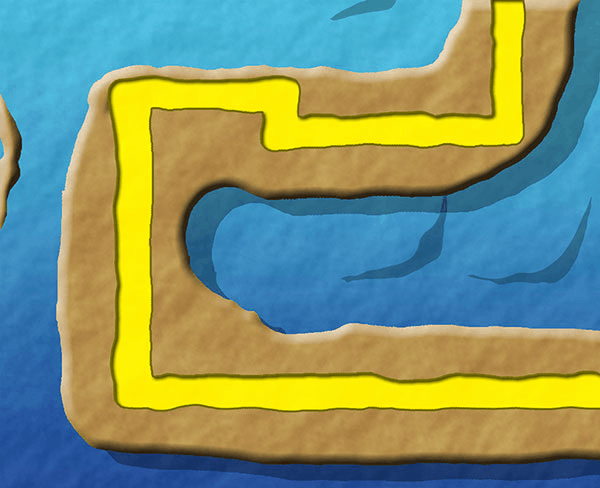
The above was one of my earlier maps which I went back to and actually made improvements on. Environment props, lighting and colour improvements are just some of the things that can make your map look that much cooler. There’s also animations but I’ll get to that next time when the game enters the polishing phase.
Also, not to mention that for every map created, I have to do the tilemap array – to set what tiles are ‘buildable’ on, what tile is an environment and what tile is a pathway. I can just use ones and zeroes, but I use different numbers to denote special tiles that I may have use for in future content addition. It tends to get very boring because it’s just (almost blindly) typing 1s and 0s, but it is a very important job.


0 = Buildable
1 = Pathway (you may build traps on pathway in the future*)
2 = Environment / Obstacle
3 = High ground (turrets built here will have increased range in the future*)
*As you can see, although I have plenty of ideas for this game, I have to control myself from going out of scope – time isn’t infinite and for this game to be published, I have to stay within the scope I created for myself. But it’s always good to think ahead of time so you prepare for the possibility of integrating those new features in advanced.
Designing the Upgrades Screen (CONCEPT)

The upgrades screen underwent a few changes and I spent quite a long time deciding how the interface was going to be. I didn’t want the screen to be cluttered with up and down arrows for every skill icon because that is simply ugly. I also wondered if I wanted to do a ‘popup panel’ for each skill, but if I do intend to expand this game to the mobile platform, it would be a bad idea.
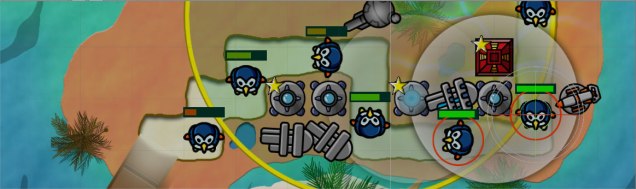
Adding Difficulty Modes!

I also added something from the Impossible Scope. Each map can be played on 3 difficulty settings with HUGELY increasing rewards. The 3 modes are NORMAL, HARD and NIGHTMARE. The specific details such as rewards, difficulty multiplier aren’t decided yet at this stage. And yea, the purple ‘night’ graphic is for nightmare. Wordplay!
I figured that since I was doing the LevelSelect, I might as well have done this anyway. It is still a work in progress and I figure most of the work for adding difficulty modes will actually not be the art or coding, but with balancing the difficulty level and rewards for attempting higher difficulty modes.
Level Select, Upgrades, Stats and Menu
As of now, the game has a fully functional level select with map unlocking, a skills page with about 8 working skills, and a stats screen. The stats screen is filled with tons of useless information because I use it to debug hidden stats as well. The stats screen will be cleaned out eventually.
I also used my first ever particle system in Unity – to add some sparkly effects to the map selection. Just like the art, it’s just placeholder fancy effects for now.
I also have a main menu that I scripted in 5 minutes and you can see tell by the screenshot above (the one with the huge blue empty space). It has a working save and load system that’s uses serializable data. The menu was put in place because I foresee I may have to send my game to be playtested soon but more importantly, I need a working interface to load multiple files for me to test variables set to different values in different save files. Again, more for its debugging purposes. For example, I can set a savefile to have extra skill points just to see how it affects progression. This is useful if I want to test variables such as how many skill points each hero level should give.
Camera Zooming
One thing I noticed while watching the scene in Unity while developing was how much I wanted to zoom in. I have to admit, the turrets look a little too small sometimes. But adding a zoom mechanic meant I may have to do a lot of things. Other than setting the camera to a higher zoom, I also need:
- A bounding box
- Scrolling the map with WASD
- A mini-map if necessary
- Zooming in and out with mouse wheel function
This is a pretty late time during development to add such a major mechanic. But I did manage to code 3 of the 4 things in the list above.
I set the game to be fixed at a new 1.5x zoom and it does look pretty sweet on 1.5x zoom. 2x zoom is overkill.
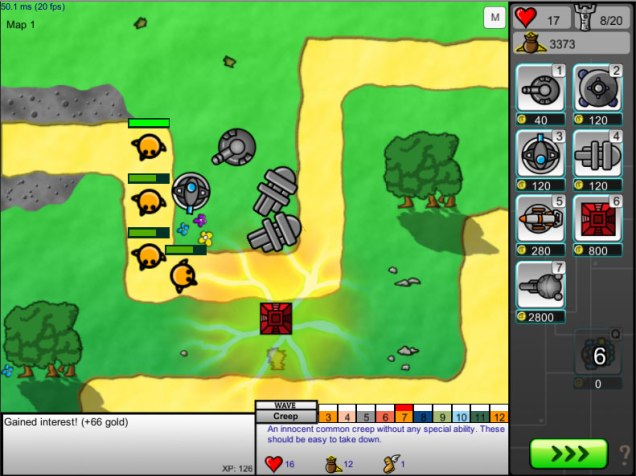
I can actually see more details on the turrets. But for players who prefer to just see the whole map at an overview, then I have to add the ability to zoom with the mousewheel.
I actually went to search for tutorials because I wasn’t confident of my ability. But in the end, I couldn’t find a good camera zooming that fit my game well, so I made one myself!
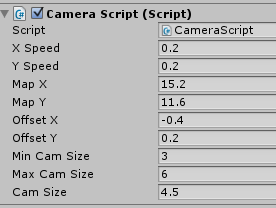
And miraculously, it worked like a charm. I’m actually pretty proud of this code. Although someone posted a working code of adjusting the bounding box, it only worked if your map is at the origin. You couldn’t offset it, and you can’t use that code if you intend to adjust your zoom real time with the mouse wheel.
So I decided to try and modify his code to make it support dynamic zoom, and I did it! If you’re a programmer, this may not seem like much to you, but I was really happy to have figured out the code to dynamically adjust the bounding box for myself. There are probably other (better) ways to code this, but this was the way I did it.

This whole thing functions in a single script I attached to a game object containing the camera, so I can disable or enable zooming anytime with the touch of a button. I can even modify its min and max zoom level, currently the minimum zoom is 1x, and the max you can zoom to is 2x! It still is very clunky with my custom values, but this script will be very useful if I do make other ‘zoomable’ games in the future.
You can see me test out the finalized zoom mechanic here:

You can see that I kept clicking on things to see if I could select them properly. That’s because I previously used an alternate code and tried to offset the map, which caused problems where the mouse position or screen position does not sync with the map. The turret was built at a different spot from the mouse position when I had offset the map.
Edit:
I’ve added extra functionality to the camera. Players without a mousewheel can zoom with the PageUp/Down keys or the + and – buttons. You can also use the mouse to click and drag to scroll the map in addition to the WASD/arrow keys.

The mouse dragging was still very clunky in the GIF above, but I added a Lerp code to control the panning ‘speed’ based on how zoomed in you are. It worked perfectly.
Fine-tuning the Controls
This being a TD game, there are several shortcut keys that must be in place for the player’s convenience. As a player myself, I get highly annoyed by games that do not offer me shortcut keys – especially those that were built for mobile and the developers just blindly ported it to PC to reach another audience.
As I played my game, I noticed myself instinctively pressing ESCAPE to cancel my current selection. However, the ESCAPE key brings up the menu, and it was highly annoying. So I made it such that the ESC key cancels your current selection – if you selected an enemy, it cancels the selected enemy, and it works for turrets too.
And only when you press ESCAPE when nothing at all is selected, then the menu appears.
The other control fine-tuning is that if you press the same key on the keyboard, then press it again, it cancels its last action. So if you wanted to build Turret 2, but changed your mind,you can press ‘2’ to cancel your build. ESCAPE also works, but if you are rapidly placing turrets, this is helpful if you are lazy and don’t want to move your fingers across the keyboard, especially for Turrets 6 onward, where the ESCAPE key is far.
Yes, I realized I am one of the lazier players who just prefers to have my fingers over the keys I mainly use!
That said, I’ve also been in the shoes where I didn’t quite understand a particular stat. Some games display helpful tooltips when you hover your cursor over stats, but some games don’t do that and it can really confuse the player – one of the reasons players quit is when they don’t understand what is going on in the game and what all those numbers and stats mean. If the player doesn’t know what your stats do, he doesn’t know what to upgrade, he’ll feel lost and lose interest very quickly no matter how content-rich your game is.
This being a TD game and I have a hero character with an upgrade menu that’s growing by the day in complexity, I know I need to have to display information without obstructing the main gameplay by flooding it with tutorials / annoying popups and such.
Oh and talking about the hero…
The Hero Character (and its problems)


Although I said that I did not want to implement a hero character at this early stage of the game’s development phase, I decided to do it now because having a hero character in the game will greatly affect the balancing and I have to tweak each map’s difficulty. So I want to finalize the hero’s role in the game before moving on to other key areas of development.
There are some features that make the hero special from normal turrets:
- He doesn’t cost any gold to ‘build’, but he has a cooldown before he can be summoned to the map.
- He can be sold and moved around the map, but with a cooldown so he isn’t exploitable by always putting him in a boss’s range
- You can only have 1 Hero character on the map
Now when thinking about my hero, there were a couple of questions I had to ask myself.
- Should he be upgraded with gold like normal turrets?
- When you upgrade him and he is ‘sold’, does he reset back to Upgrade Lv 1 the next time you place him?
- If his upgrades persist, it may cause balance issues where player is able to repeatedly ‘sell’ or ‘move’ his hero to always be in range of a boss or creep
Then there was an even bigger issue was that because the hero can level up, he gets really strong compared to other turrets at the beginning of a game. The turrets start at level 1, but the hero can be at level 10 or 20 in the first wave! But because he doesn’t scale like other turrets, he gets very useless late game because giving him upgrades that scale the same way as turrets makes turrets useless! The player would just spend all their gold on the hero character and ignore turrets. But make the upgrades weak or disallowing upgrades makes the hero useless late game. So either way, I was pretty screwed.
After lots of discussion with my friend, we came up with the idea that the hero will be a special unit that is very powerful, but you can only use him for a short duration and he will ‘disappear’. It was the right thing to do and I loved the idea – there is no point keeping the hero on the map forever when he gets useless toward late game. Better to remove him once he starts to become useless. The hero is still very powerful despite his limited use, and he can turn the tide of battle when you deploy him in a critical wave. This adds strategic depth to the game that I never imagined before.
The implementation for the feature took very long. I spent a whole night finalizing the design and changes, and also pacing around my house thinking of and trying to predict if a change as major as this would cause any issues.
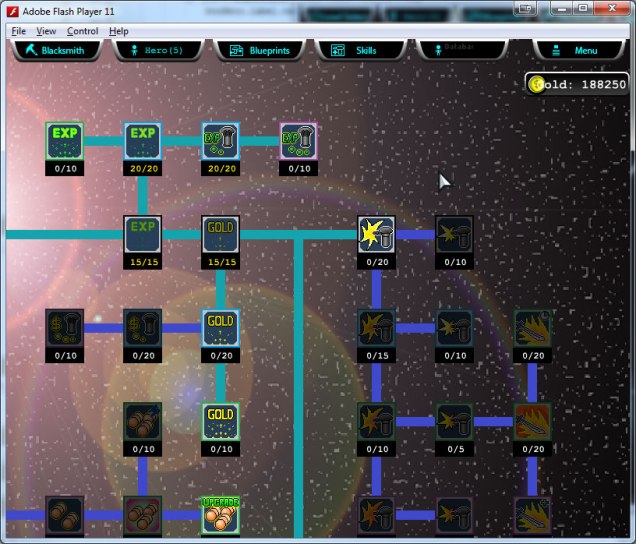
Skills / Upgrades!
One of my favourite things to make in any game is an upgrade system. I love a game that gives me a sense of progression and getting stronger with time, and I want my game to have this as well. To do so, I incorporated the upgrades system. I didn’t want to be too fancy with a skill tree.
Well, the thing about having skill trees is you probably make it for the purpose of unlocking stuff and pre-requisites. But they can get very complex from a balancing perspective. It has its pros and cons.
The last time I attempted skill trees, it didn’t go so well not much because of programming or art, but more so in how the tree was designed. This time, I really want to go as simple as possible, so I just want to use a simple unlocking system – by hero level and displaying all my skills in one screen.
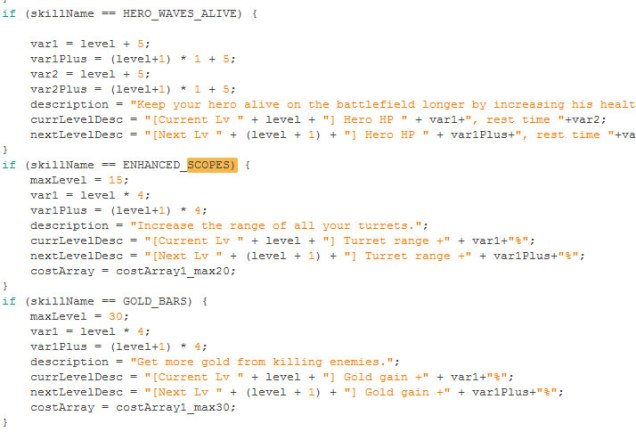
Each of my hero’s skills contains a max level as well up to 3 variables which I define in the Skill class. These variables can function as passive damage, or gold increase, depending on what skill it is. These skills are added to my Hero class and my hero has a getSkill() so that I can conveniently get any data such as interestRate, turretPercentDMG, or any other bonuses from anywhere in the game.

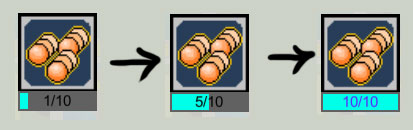
I also spent a lot of time tinkering with what I feel is the final UI. You can hold SHIFT to increase/decrease skills by x10 without having to click multiple times. You can also hold down the mouse button on an arrow if your SHIFT key is spoilt. Additionally, the arrow keys on your keyboard increase/decrease all skill levels by 1. Now nobody can say I don’t have enough shortcuts!
I also love the UI in the sense that there is a bar below every skill that fills up as you increase it. It’s a very visual way to see how much of each skill you have your SP in.
Upgrades aren’t new to this genre, but doing it is not an easy feat either. It is much easier to create a sandbox TD than it is to create one with progression and a leveling / XP system. Not many TDs attempt this I guess because of how tricky it can be to try and blend a bit of RPG into a TD. Most casual TDs keep their upgrade system simple and straightforward.
If I were to make a sandbox TD, it would have been a lot easier. There would be no need to spend so much time on balancing. But because I have multiple maps, multiple difficulty modes and unlockables, the progression of the game has to scale properly. I can’t have an easy level followed by a hard level, or a gold formula where it is so hard to get gold at the start and then by late game you earn so much gold you insta-kill bosses, which is what is happening in my game right now. It’s ridiculous!
So yea, upgrades are a very treacherous territory I’m venturing into, but I will get it done!
Revisiting the Enemy
Other than the stuff I mentioned in Part II, I actually spent very little time talking about the enemy even though it’s probably one of the more outstanding things about this game. So I’ve decided to talk about it! Besides, I’ve made some changes to some of its statuses as well.

The enemy has two important scripts to make it work. A MoveEnemy script controls its speed, max speed and its position along its current path.
The Enemy Script is far more interesting. Here, every data about the enemy is stored and can be extracted. Things from its reward to whether it is immune to your slow turrets. The only thing missing is Health, Armor and Damage Reduction values which are stored in the Health Script, a separate script attached to the enemy’s health bar, which is a component of the enemy itself. I revisit the enemy script every so often to modify stuff – not so much to add stuff any more because it already has everything I need.
But there’s another very important thing in the game – Turrets. And there is one particular turret that is giving me a lot of headaches.
The Sniper Optimization Dilemna
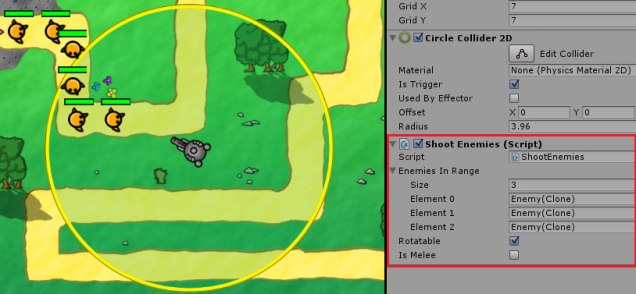
Every turret in my game has two basic scripts attached to it – A Circle Collider component, which determines the range of the turret, and a Shoot Enemies script attached to it. When an enemy enters its range, it is added to its own list, ‘Enemies In Range’.
One of the more challenging turrets I added is the Sniper. Today, I ‘re-coded’ the Sniper’s special ability – it can shoot invisible creeps which hides itself from your turrets. It gets technical here on, so skip the next paragraph if you don’t want to read the programming aspect.
There were so many ways to code this feature, but I didn’t know what the most optimized way was. I decided to code it such that all enemies disable their colliders when they hide, and then re-enable them when they unhide. However, without colliders, sniper turrets will then require an internal function that does a distance check to continuously detect if an enemy is in range. But without a collider, again it meant I had to somehow get a list of all enemies on the map – not just the ones already added to my list of hittable enemies, but also the ones that aren’t – the reason being that without colliders, even the sniper turret has no idea when enemies enter its range. So there was actually a need to consider what was the better way to get a list of enemies spawned – create a List that is stored in the map object, adding enemies spawned to this list…OR… create an empty parent game object within which all enemies are instantiated in. Then the sniper will reference this parent to get the enemy list.
There are just so many things to think about when adding a feature like that. I did however, in the end get it to work.
Balancing Pt 3
Jokes aside, balancing this game has been a pain. As the game grows, there are more and more variables to account for. And right now I spend more time testing than actually developing the game because I want to get the pacing and difficulty of the game correct.
Mobile Porting and Testing (13~18 Dec)
As I was overseas for 6 days, I did not manage to add anything for one week. But that’s not to say that progress was not made in these 6 days. Before I flew off, I managed to port my game to Mobile.
The reason was not because I want to launch this game on mobile, but rather, I needed a platform on which I could readily access my game (and show it to potential employers in the future I guess?).
It was pretty major to me because I know the difficulty of porting a game to mobile. Sure, Unity makes it easier, but if done incorrectly, it can cause problems. I spent about 2 hours trying to get a proper aspect ratio and resolution for an Android build because the game kept looking like this on my phone:
It was a hot mess with the UI jumping about and being in places they should not be. What’s worse that my flight was early in the morning and I was extremely sleep deprived as a result of burning midnight oil trying to port my game. I was EXTREMELY tired when I was doing the mobile porting. I think each time I waited for the game to compile to my phone, I would fall asleep for a few seconds. Seriously, I was just soooo tired.
Thankfully, it worked in the end! Though playable on phone and having the game work much better than I thought, it really isn’t very optimized. Nevertheless, thanks to this, I was able to test my game while overseas.


List of improvements (and some balancing notes) I took down during my playtesting while overseas
The improvement list contains stuff to make the game better – mostly quality of life and better UI / interactions to enhance user experience. I also wrote a lot of code on my phone. By the end of my trip, I had accumulated 40(!) pages of notes on my phone. Apart from improvements, I also had a bug list and other lists for different purposes.
Not to mention, I also wrote code.


Yeah there were apparently more pages of code than I thought as I was exporting all my notes from my phone to my desktop.
There’s code for an Equip class, even a Spells feature from my mega-impossible scope, but most importantly, an extension of my Turret script, for a very new feature I intend to implement very soon – BUILDINGS.
The reason why I wanted to pseudo-code on my phone was because in programming, I sometimes find that people sometimes can jump too quickly into coding a feature only to realize later on that there are better ways to code it. I’m no exception, especially when I am so excited about my game. Sometimes, I don’t think long term enough while coding and this makes it hard for me to expand the game.
Thankfully, having 6 days away from Unity gave me PLENTY of time to deeply think and analyse what I feel is the best way to code certain features in my game.
And I managed to code 4 scripts overseas! Yes, actual scripts that I could use in my game the moment I got back to Singapore. I had access to a laptop there, downloaded Unity and began coding. I didn’t manage to sync my project with Dropbox, so I mostly coded independent scripts that would work without my game – a script for an inventory system and an Equipment class that is able to be extended to house several equipment types like Wand, Robe, Glove etc.
I also have some pages on plans on a ‘Challenges’ feature and on the implementation of the ‘buildings’ feature.
 I also drew some mock-ups of some UI and visual diagrams (more for my own reading).
However, the inventory system and equipment script are for ‘impossible scope’ features, which have extremely low priority on my to-do list. I won’t be adding features in that scope to the game until I settle the things in my medium scope. I might even not add them at all but in a sequel because the current game really has a lot of features already.
THAT’S ALL FOR NOW!
 So I guess that’s all for now. The next time I write here will most likely be a new post about 1 week from this one. It has just been too much fun but I’ve got a lot of work to do now that I am back in Singapore and I really want to get on with implementing all the things above. I have already implemented Challenges and have a working Building script, which I am super excited to talk about in the next post!
