
This is part 4 of a series of posts of making an idle game. See Part 1, Part 2 and Part 3 here.
Offline Progress
This being an idle game, there has to be some form of offline progress so you don’t have to leave your computer or phone on all the time just to progress.
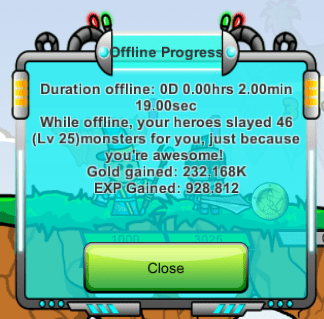
It simply works by tracking how much time has elapsed since your last time of play. There are a few preventions I’ve made to prevent time travellers (people who change their system clock to gain huge rewards). This basically makes it harder for people to cheat and a little more tedious. I didn’t want to put in too much effort in cheat prevention since if people want to cheat, they will find a way anyway. At the same time, I think it is not good if a game is too easily exploited. Thus, I did not want to make it too easy to cheat in the game so I made a few extra checks in calculating the offline progress.
If the game detects that you have “time travelled”, it gives you a very visible warning. If you however, continue to time travel, and the game detects repeated time travelling attempts, your offline progress will be nerfed.
Character / NPC dialogue
Almost all of my games have some kind of dialogue system. Like the achievement system, it’s one of those “standard” kind of things that I end up re-using for every one of my games. This game is no different.

The person talking appears on the left, which can even be your characters and heroes. The NPC will play the idle animation usually. The dialogue in this game is the most complex I have ever made.

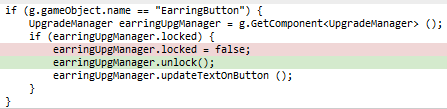
I probably should have written a dialogue manager to organize the dialogues. How dialogue starts is I type something like:

Which brings me to:
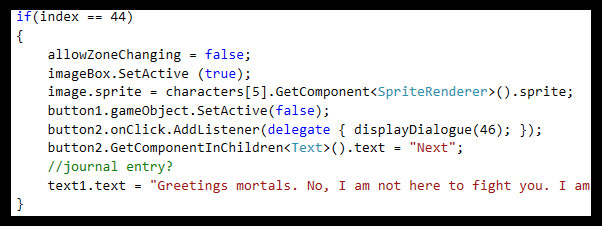
Unlike my tower defense, each dialogue message requires its own ID. My tower defense used a different design where you could put multiple messages under a single dialogue ID which makes it a bit neater, but it cripples some of the customization I can do by separating messages into different IDs.

High resolution graphics
When I first started working on this game, I had issues understand what resolution to make my game at, but now I try to understand how graphics scale on different resolutions and devices and how the different camera settings affect the way graphics are drawn on the screen.
Early versions of my game had a “blurring issue” on high resolution phones, like my Samsung Note Edge which has a resolution of 2560 x 1600 pixels.

It was because my graphics were not designed for such high resolution devices, a pretty amateur mistake I had made when I was doing the graphics. In Flash, you only need to support the resolution you are publishing the game at. But for publishing a game to mobile, you have to cater for the HUGE variety of phone resolutions.
800 x 480, 1000 x 800, 1024 x 768, 1600 x 1000, 2560 x 1600 and so much more!
At this point I had realized that I had not set up my game properly to support these resolutions, but I worked around it and made a script called ResolutionSetter.
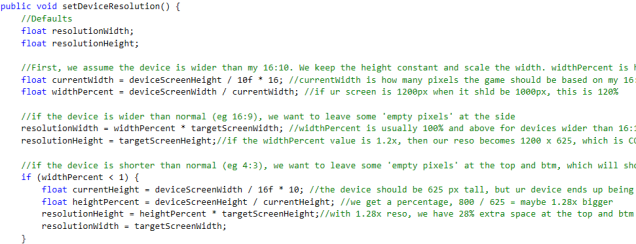
This basically sets the resolution of your device to my target resolution. It’s the neatest and quickest fix I could find for my game at this point. So if your phone is 2500 x 1200, and my game is 1000 x 600, it sets your screen resolution to 1250 x 600, which allows my graphics to be displayed on your screen at a 1:1 ratio while still retaining aspect ratio. This causes no blurring in most cases.
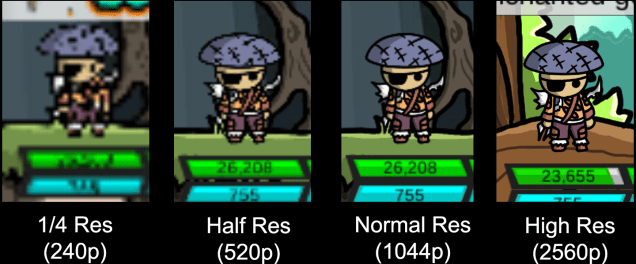
Just for fun, I experimented with making my game run at four different resolutions on my Samsung Note. I made a 1/4 Res and Half Res version for fun. It was hilarious seeing the results and playing my game at ultra low resolution on my super high resolution phone.
Here’s how it looks:
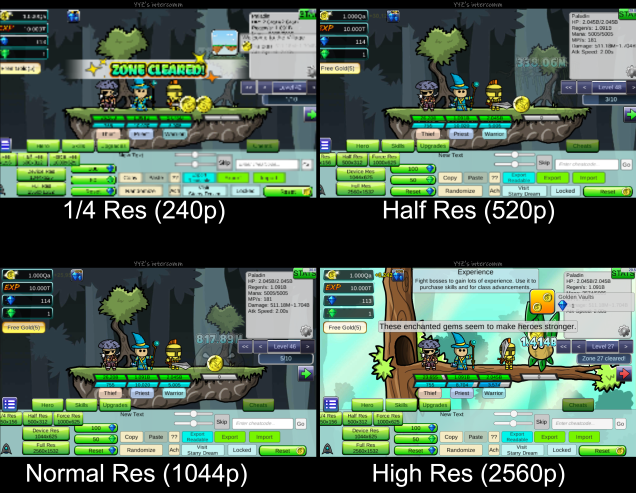
It’s a very useful script I think I may bring over to future games. It basically does what Unity’s SetResolution does, but I modified it to not screw up my game’s aspect ratio, which somewhat combines the best of both worlds.
The advantage of this approach is that my graphics will never get scaled up even on high resolution devices which can cause interpolation and blurring. I retain high control over how my graphics appear on different devices. I can set it to render at high res on high res devices and set it to normal res on phones with resolutions lower than 1048 pixels for example.
It’s not the best approach to use, but it is the most suitable one for this project at this point in time.
A possible downside is if you want to design your game specifically for high resolution devices and want them to appear super sharp on those devices, your graphics will not be as sharp if you don’t build your game on a high resolution or export your graphics to cater for that resolution. But this is something I don’t foresee doing as my game is not built for high resolutions now. I’m using “1000 x 625” as my target resolution. If I were to support high resolution graphics next time, I would modify the script to a higher target resolution like “2000 x 1200” instead of “1000 x 600” and the script will aim for that.
Buffs

At the top of the screen is a row of buffs. Rolling over them shows its description, effect and level of the buff. Each character has its own buff tray.

But how are the buffs applied?
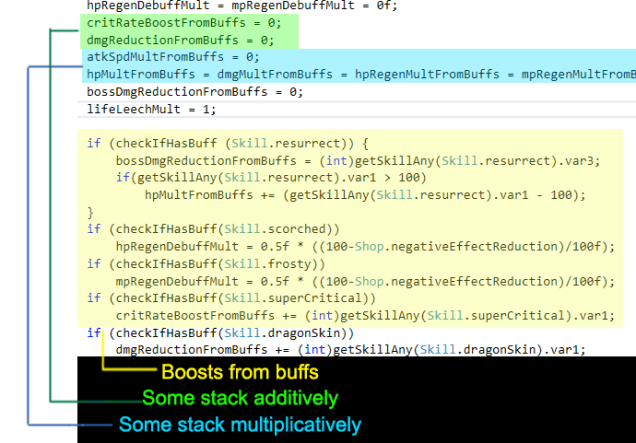
Some things like critical rate can be stacked additively or multiplicatively. I usually put the word ‘boost’ in stuff that stack additively and ‘mult’ in those that stack multiplicatively.
For example,
critRateBoost and critRateMult
finalCritRate = (baseCritRate + critRateBoost) * critRateMult
This is executed from a script called the HeroScript which is attached to each hero. When you add or remove a buff, the bonuses from buffs are reset and you add any stats gained from any buffs existing on the character.
The Hero Script

The hero script stores every variable you need to know about the hero. From how much base damage, total damage, multiplicative damage he has, to how much health he regenerates when he attacks an enemy, to how much mana he gains each second, his defense, crit rates, his health multipliers, how much defense he gets from buffs and etc. EVERYTHING YOU NEED TO KNOW IS HERE.
But with so many variables it gets very confusing as to how they are calculated. If the calculations are done in the wrong or unintended order, it can lead to serious issues. But here’s a flow chart I drew that hopefully simplifies the process.

When the hero is created, he first initializes his base stats and gets data from what class he is (is he a warrior or a mage?). If he’s a warrior he may have higher base health and increment per level.
Then, apply any passive skill bonuses he has. A warrior typically has some passive skill that increases HP.

Then apply any class bonus boosts if he is a higher tier warrior (Knight / Paladin).
Then apply the boosts from the main equipment upgrades which takes into account his equipment level.
Then apply any existing solo or party buff effects.
Then apply any global multipliers from the shop/achievement/ascension upgrades.
Now what happens when you buy something, earn an achievement that provides a passive bonus, or you buff or get buffed or if one of your buffs expires?
Recalculating the hero’s stats in every frame is expensive so if any of those things happens, recalculatePowers is called, which in turn recalculates the hero’s stats and gets the new multipliers from the various aspects of the game (Guardian, Shop, Achievement, etc).
Once everything is applied, the hero’s stats are updated with new values and then a call is made to the statsPanel and the upgradesPanel to update the UI to show his new stats. If the player is hovering over a popup over any of the buttons or skills, that popup must also be updated.

Loading Enemies
I was testing out my game on weaker low-end devices and the game actually crashed. Yes, it was that horrible. I had to make several changes to the way the game loads its content.
How unity loads the assets is that my game takes place in a “Scene”. This scene is called the Game Scene and it contains everything – all the enemies, their sprites, character graphics, backgrounds must all be loaded before the Game Scene can run.
The phone was crashing on the loading screen. So I ran the profiler to see if it can tell me what went wrong.
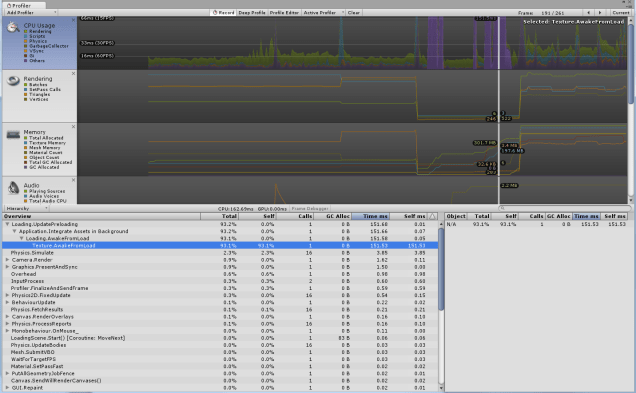
I saw that a lot of CPU resources were spent on Texture.AwakeFromLoad. It was likely because the game was loading all 150 enemy sprites when you start the game.

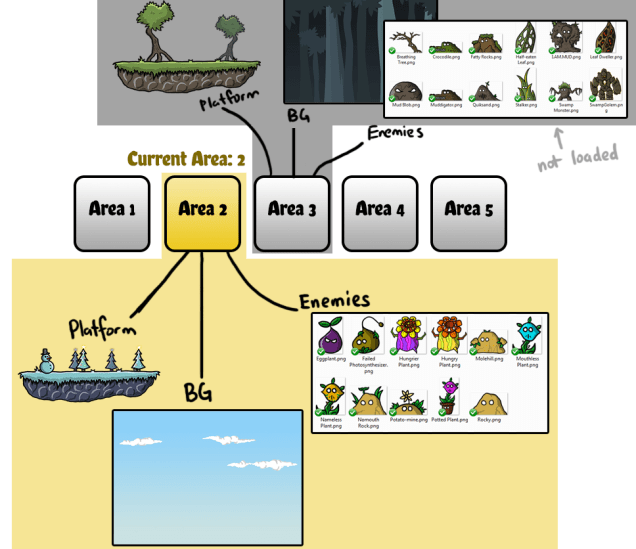
I kind of expected this, which was why I wanted to learn Asset Bundles. I had looked into it before. Instead of loading everything when the game starts, you should ideally only load WHAT IS NEEDED. This depends on your game though. But since my levels are separated into 10 main areas, I should only load the area the player is currently at.
Instead, I was loading all 10 areas at once, which causes huge overhead. Unfortunately, I was unable to figure out how to use asset bundles so I used an alternate approach.
I removed all references to the sprites. So basically the enemy is empty at the start. It stores no graphic and is literally just an empty shell of nothing. As the player enters an area, I load a prefab containing references to all the enemy sprites of that area. The enemy now has access to about 10 sprites, but not all the 150 sprites like previously.
So if I enter the desert, I load all the desert enemies. If I enter a swamp, I only load swamp enemies. I can also choose to unload the previous area’s enemies to reduce memory consumption (It seems that anything that is referenced or loaded in the scene, whether visible or not takes up memory, but I’m not sure and I need to run some tests).
This way, I only load what I need. The downside is that there is a noticeable pause on slower devices when advancing to a new area because the game has to load the new area’s enemies.
Previously before this change, the game has to load ten 1024×1024 px backgrounds ALL AT ONCE. However, now it only needs to load the background for your current area.
If you have played other games like Tap Tap Infinity and Tap Titans, you will notice the pause between areas as well. However Tap Titans was very clever. They hid the pause behind a fade to white screen transition. And the loading is executed while the screen is white. While loading, an animation showing the title of the next area moves into the screen, keeping you occupied while the loading is occurring. Most of the time, you don’t notice it because the loading is hidden behind the white screen and the title text animation.
Optimizing enemy loading further
Enemies are the biggest problem during loading times.
I decided to at this point reduce the resolution of my enemies. They are at 2x resolution to support high resolution devices. However, the enemies are currently taking up too much space on phones that do not have that kind of resolutions.
I mentioned atlases previously. An atlas basically combines individual enemy graphics into a combined image to be more efficient. If you’ve made or seen flash games, or any games, character animations are often put into spritesheets containing the different frames.

So if you have 10 separate images, you put them in a spritesheet and you have just one image containing the 10 frames. The game only needs to load that one image and not have to force the engine to keep swapping out image for your one character. This leads to better performance for your game.
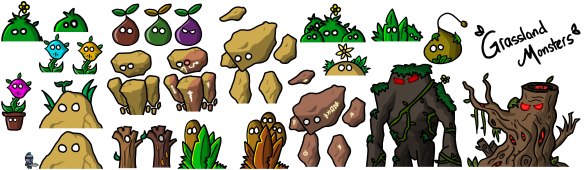
Similarly in the diagram below, if you have all those 10 enemies on screen at once, you only need to make 1 draw call as compared to 10 draw calls since you only have one huge texture comprising of everything you need.
But one should not blindly just put monsters into an atlas. If wrongly used, using atlases can turn out to have a negative effect.
In my previous atlas, enemies of different areas are being packed together! This is a BAD thing to do. What this means is that when it is trying to load a particular enemy, say the grassland enemy, it ends up loading the entire atlas, filled with other enemies from other areas that you never need. This takes up additional resources when it is unnecessary! I realized what a big mistake I had made.

Instead of packing all my enemies into an atlas, I now split my enemies into different atlases by the area so the game does not load enemies that will NEVER be drawn on the screen. For example, if I am in the grassland, I should only need to load the grassland atlas and not have to make any requests to load textures from the candyland atlas.

This way, I have a maximum of one enemy atlas loaded in the game when I am in an area. Combined with the lowering of enemy resolutions, I could fit an entire area worth of enemies in a single atlas, which is really awesome!
The game loads in 4-5 seconds even on a very low-end device! It loads in 1-2 seconds on high-end devices.
Combining SpritePacker and Resources.Load
One small technical challenge I faced is that you cannot load sprite atlases in runtime. This is because the game cannot tell when you need the atlas. (Either you load them all at the start or you don’t load them at all.) To use a sprite atlas, you have to know exactly where you need it and when you need it. But I cannot predict when the player will reach the next zone.
This means that you lose out a lot in performance if you want to load individual sprites in the middle of the game (eg when the game has already finished loading the scene).
But you can be a bit creative with how to go about this issue. Actually it’s quite straightforward and takes advantage of how the game allows you to create objects in runtime.
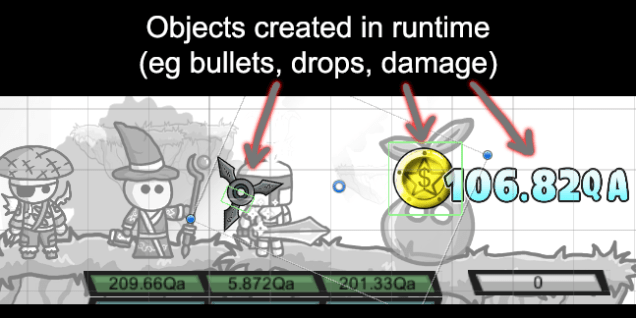
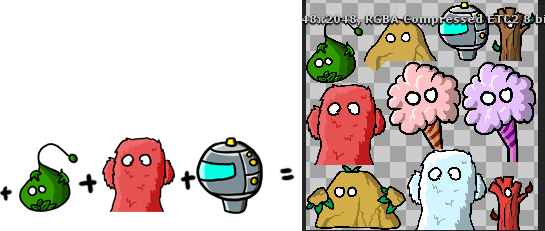
Those damage texts that float up when you damage the enemy, those bullets that are shot from your player are all created in runtime (after loading is finished). So what I did was I created an object that held all the references to the sprites I need. This way, I’m not loading the sprites individually. I’m loading their references to the actual sprites. And those sprites can be sprite packed, which combines the best of both worlds.

When I want to load the sprites, I load the object, which stores the references to the sprites and assign the sprites to my enemy object.
Background Atlases
Another scenario where the Atlas is bad was when I packed all my backgrounds in a super huge atlas, which required the game to load the super huge atlas, just to retrieve one background.
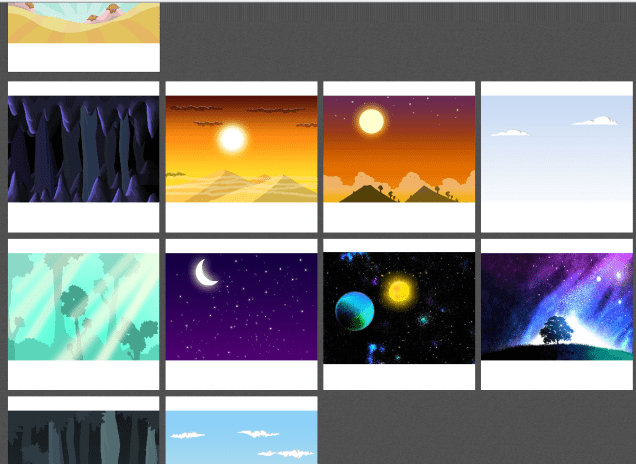
At any one point time in the game, only one background is drawn on the screen. In this case, the game is only using up less than 10% of the whole atlas, but is loading the entire atlas into memory. It’s a very inefficient use of atlases, which was why I split them up. Notice the white spaces below and above each background. The white spaces are added to ensure the image retains POT (Power of Two) dimensions.
An image with dimensions like 512 x 512 or 1024 x 1024 will allow it to be compressed more efficiently via a better compression format, resulting in smaller file sizes and less memory usage.
It was also good to move the backgrounds out of the atlas because the huge atlas was 4096 x 4096 pixels, and old devices have a maximum texture size limit of 2048 x 2048px. Anything higher and the device will be unable to display it. I’ve also changed my compression settings for backgrounds from [Compressed] to [Crunched].

This is a new compression setting that only exists for WebGL and is really good. It literally crunches your textures, making them smaller. You can even set the level of ‘crunching’. Changing this for all my enemies resulted in my game dropping from 28MB to 24MB. It’s not a lot since the game already a super small size already and it’s amazing how well this game compressed from the initial 40MB. With the backgrounds, I believe it will drop even further. I set the quality to 50% because at 0%, though it is sharp, the colour quality is lost.

Notice the sand giant’s mouth in the image above. While the rest of the monster remains consistent, the colour of the mouth is greyscaled at 0% crunched quality.
At 50%, my textures retain sufficient visual quality and look good while keeping the file size small at the same time. This part of game development leans more toward trial and error sometimes.
For WebGL, one of the outputs is a .data file (which is roughly the size of my game and contains all the assets of the game). This data file will sit in your browser and require a constant heap of memory. If my game is 30MB, it means your browser needs to constantly give me at least 30MB for my game to run, which is why it is essential to keep this file size small!
The editor log is not an accurate representation of final sizes, but it does give insight into what is taking up space. Below is the log from my build a few months ago. I managed to get the complete (uncompressed) size of the game down to 129MB from the 340MB it was in the past through using better compression formats and sprite atlas-ing.
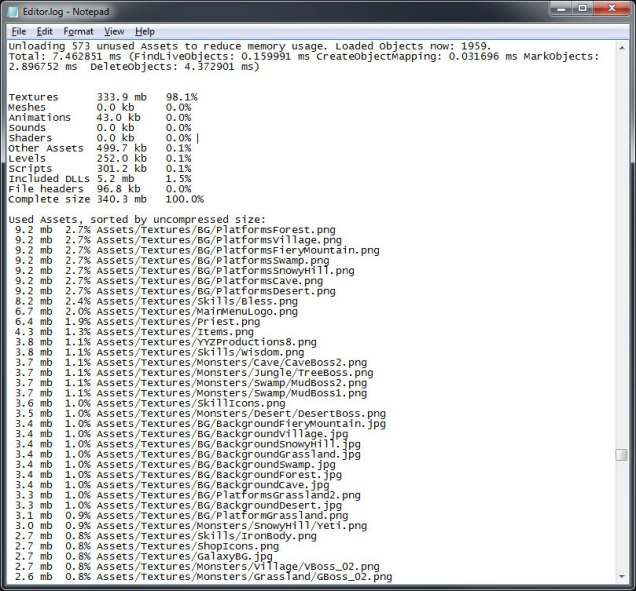
I also converted my backgrounds from JPEG to PNG. There was absolutely no advantage to use JPEGs and JPG’s lossy format was only going to contribute to lower quality graphics when they are compressed into the final game.
Shop & Secret Shop
Not much to talk about. It’s just stuff you can buy. They affect global multipliers like Shop.goldMult, which is taken into account every time you gain gold.


Journal
Because the game lasts a long duration, it is unreasonable to expect players to remember the storyline and I found this a request in many other games. People may want to re-read the storyline so I added a journal panel.

This summarizes what has happened and during the early game when there is little dialogue, it can be something for the player to read and explore about the game. It’s actually the journal which sparked off my interest in adding a story to the game.
Game Balancing & Math

When trying to balance my classes, I had to have a few sheets to calculate how much damage (DPS) each character was dealing. Because their skills have different starting levels and growth, it was important to make sure that they had similar cost ratios. For example, if the warrior gains +10% damage every 1000 EXP, and the mage gains +10% damage every 800 EXP, this eventually accumulates to a big difference and late game, players will just only upgrade the mage.
The balancing in the game isn’t perfect because there are a lot of variables which affect how each character scales. This is further made worse by status effects you can inflict on the monster, like poison, or weaken.

Or buffs that temporarily aid a particular character for a short span of time.
I am pretty sure it’s not difficult for people to find an exploit, but I want to try as much as I can to prevent imbalances in the game.
Version Control
One thing I learned in my company and working in teams is proper version control. I had been using Dropbox but it is unable to revert the entire project back to an earlier date – it only reverts individual files which makes reverting to an old version a tedious process. Even when working alone, I often found myself wanting to revert to a previous version of my game for various reasons. The most common reason would be that I did something that broke the game but there are other reasons like:
- Going back to a previous version to compare the FPS
- Looking at exactly what has changed from the previous build, and what code has changed
- Looking for old code which I deleted but need to use again, which reduces the need to comment unused code which may clutter my scripts
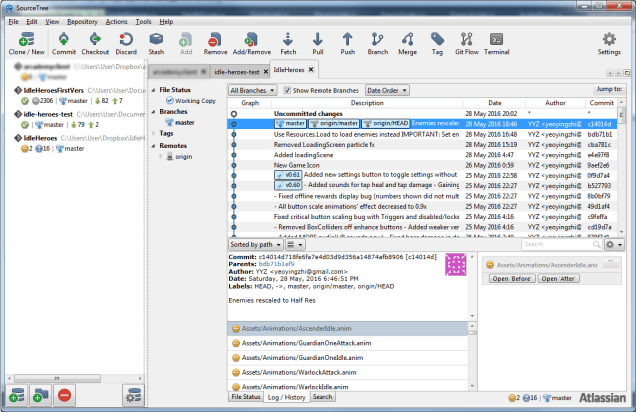
Since the time I’ve learnt to use SourceTree for my project, I’ve already used it to pinpoint some errors in my game which would have otherwise taken some time to find out. I was really impressed. I’ve not used it to revert to an older build and it’s really, really rare that I need to look at it to see what has changed (it has helped me solve 3 problems in the past 2 weeks), but when I do need to refer to it, it often tells me what went wrong.
SourceTree was probably meant for teams to manage the game that is being worked on by multiple people, but it works really great for individual use as well. Also, a screenshot containing my first commit, which was at 3.43am on 16 May:

That’s all!
That’s all for this post. The game is still in its polishing stages. Despite no more content being added to the game, the final run is the most tedious part. It took some time to go around testing and fixing bugs or fixing the minor issues and cleaning up the game.
I suppose when this is done, it actually will be the closest game I have to be properly released to the public.
I’ll write about the main menu design and write a bit about sounds in the next post.
Link to part 5 here

i play this game and it is a lot of fun. I do wish you made more updates to the game.
LikeLike
Hey there, YYZ here!
Always happy to hear from someone who’s played and loved Enchanted Heroes. I also enjoy idle RPGs and ended up making a mechanical sequel to this game called Siegeturtle, which I have just released on Steam!
You’ll find the UI pretty similar – stats at the bottom and endless monsters to fight, and instead of ‘Heroes’, you instead have 39 different animal companions to play with you.
It also has lots of new features, such as potions and equipment which I never got to do in the original game, feel free to check that out 🙂
LikeLike